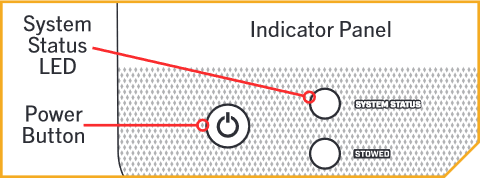
In the unlikely event the Wireless Remote, One-Boat Network app, or Foot Pedal becomes non-functioning, the motor can be stowed from the Indicator Panel at the base of the Mount or manually stowed.
Jump To:
- Stowing from the Mount
- Manual Stow Bypass
- Manually Trim the Motor
- Manually Stow the Motor
- Video Guide for Manual Stow Bypass
Stow from the Mount

- Locate the Indicator Panel at the base of the Mount.
- Ensure that the motor is on by checking that the System Status LED is illuminated blue.
- Press and hold the Power Button on the Indicator Panel for ten seconds.
- The blue and orange LEDs next to the System Status (blue) and Stowed (orange) Indicators will flash alternately, and the motor will begin to stow.
Manual Stow Bypass
If the motor loses power or will not stow by any other method, a Manual Stow Bypass procedure can be used to stow the motor.
The Manual Stow Bypass involves two steps:
- Manually Trim the Motor
- Manually Stow the Motor
Manually Trim the Motor
- With the motor deployed, locate the Trim Release Lever on the side of the Trim Housing.
- Firmly grasp the Shaft of the motor. While lifting up on the Shaft, open the Trim Release Lever.
- Manually trim the motor by pulling the Shaft upward. Stop lifting when there are roughly ten inches of Shaft remaining below the Steering Housing.
- Rotate the Shaft so that the Prop faces Port. The Lower Unit should be perpendicular to the Mount.
- Close the Trim Release Lever to secure the Shaft in place.
Manually Stow the Motor

- Locate the Quick Release Lever on the Steering Housing, above the Tilt Shaft near the center of the Mount. Open the Quick Release Lever by lifting upward.
- Locate the Quick Release Pin on the side of the Steering Housing. Push in the center of the Pin. While keeping the center of the Pin pushed in, pull the Pin completely out of the Steering Housing.
- Locate the Latch Bracket Handle on the back of the Steering Housing, near the Motor Ramps.
- Firmly grasp the Shaft and raise the Latch Bracket Handle. While holding both the Shaft and Latch Bracket Handle, pivot the trolling motor into the stowed position.
- With the motor in the stowed position, release the Latch Bracket Handle, while maintaining a hold on the Shaft.
- Locate the Trim Release Lever on the side of the Trim Housing. While holding the Shaft, open the Trim Release Lever.
- Pull the Lower Unit fully onto the Motor Ramps. Secure the lower unit on the Motor Ramps and close the Trim Release Lever to lock the motor in the stowed position.

