This article will give a general overview on using the Endura.
Jump to:
- Endura Features
- Endura Motor Anatomy
- Lever Lock Transom Mount Features
- Hand Control Features
- Handle Installation
- Motor Installation
- Serial Number Location
- Stow and Deploy
- Controlling Speed with the Tiller
- Adjusting the Depth of the Motor
- Adjusting the Steering
- Adjusting the Bracket
- Resources:
Endura Features
- The Endura is Freshwater only
- Hand Tiller option only – Telescopic Handle
- 2-year warranty & Lifetime warranty on the composite shaft.
- All models are 5 speeds & 12 volts only.
- No foot pedal option, no remote option, and no built-in sonar options.
- Ships with handle not installed, the consumer must install the handle
- The Endura is not intended to be a primary propulsion motor.
- NEW Battery Test Meter on motors made 2023 and later
Endura Motor Anatomy
Lever Lock Transom Mount Features
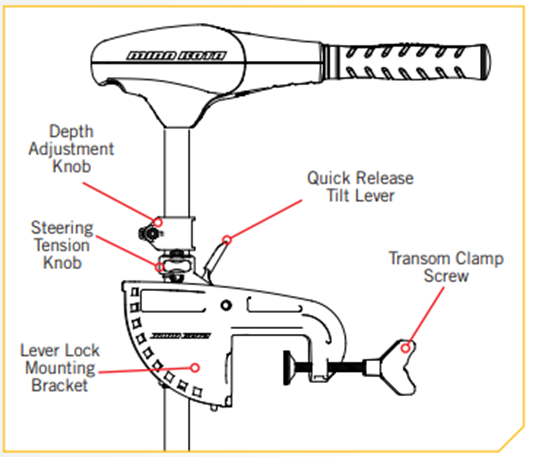
- Adjustable Depth Collar - This is used to adjust the height of the motor vertically. Loosen the steering tension knob and depth collar knob until the shaft slides freely and then raise or lower the motor to the desired depth.
- Steering Tension Knob - Adjusting the Steering Tension knob provides enough tension for the motor to turn freely, or you can tighten the knob to place the motor in a preset position.
- Tilt Lever - While pressing down and holding the Tilt Lever you can grab the control head and tilt the motor forward or backward to the desired position.
- Transom Clamp Screws - The bracket sits over the top of the boat transom. By tightening the clamp screws (by hand) it will clamp to the transom and hold the motor to the boat. Loosen clamp screws to remove the motor from the transom.
Lever Lock Transom Mount Bracket Dimensions
Hand Control Features
- Telescopic Handle - 6” telescoping tiller handle.
- Steering - With a hand-controlled model to steer the motor left or right, you will just push the handle to the left or right to change the position of the lower unit.
- Controlling Speed - This motor offers variable forward and reverse speeds. The speed control may be operated in either direction, forward or reverse. Turn the handle counterclockwise from (OFF) to increase reverse speed and clockwise from (OFF) to increase forward speed. Speed decreases as you approach Off.
Handle Installation
Once the handle is installed, the installation is permanent.
- Remove the Wire Clip from the Ball Detent located on the Inner Handle.
- Install the Outer Handle over the Inner Handle. Position the handles so the Ball Detent and OFF are aligned.
- Push the Outer Handle into the control box until handle clicks into place. The handle is held in place with locking fingers, so some force may be required to lock the handles together.
- Once the handle is locked into the control box, it can be rotated and extended for normal use.
- Once the handle is installed, the assembly is permanent. Do not attempt to remove the handle.
Motor Installation
- Find a transom area of the boat that is free from obstructions.
- Open the Transom Clamp Screws on the bracket enough so that it will fit over the top of the boat transom.
- Place the Lever Lock Mounting Bracket over the top of the boat transom so that the bracket is resting on top of the transom.
- Verify that there are no obstacles that the control box, handle, or prop might hit while in use that would restrict steering or cause damage to the motor.
- Tighten down the Transom Clamp Screws to the transom by hand only. Do not use any tools to tighten the clamp screws as this may damage the bracket or your boat.
- We recommend the tilt angle of the motor to be adjusted so that the motor shaft is perpendicular to the water surface when the motor is in use.
- For transport, always tilt the motor into the boat, such that the motor and prop assembly are completely out of the water and the motor is positioned up close to the Lever Lock Mounting Bracket.
Serial Number Location
The serial number is located on the top of the transom bracket.
Stow and Deploy
-
Stow
Press and hold the tilt lever, tilt the motor into the boat. -
Deploy
Press and hold the Quick Release Tilt Lever, tilt the motor vertically into the water.
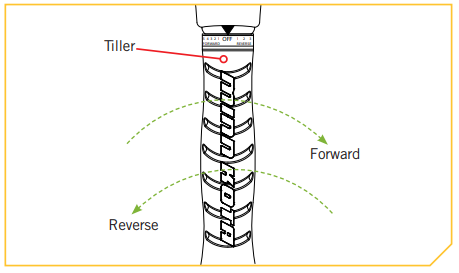
Controlling Speed with the Tiller
These motors are equipped with an extension twist tiller with a telescoping handle, which offers a choice of five forward and three reverse speeds. The speed control may be operated in either direction, forward or reverse. Turn the tiller handle counterclockwise from (OFF) to increase reverse speed and clockwise from (OFF) to increase forward speed. Thrust decreases as you approach (OFF) from either direction.
Steering with the Tiller
With a hand-controlled model to steer the motor left or right, you will just push the handle to the left or right to change the position of the lower unit.
Adjusting the Depth of the Motor
-
- Ensure that the top of the motor is submerged at least 12 inches to prevent surface water churning or agitation.
- Firmly grasp the composite shaft and hold it steady.
- Loosen the steering tension knob and the adjustable depth collar until the shaft slides freely.
- Raise or lower the motor to your desired depth.
- Tighten the adjustable depth collar to secure the motor in place.
Adjusting the Steering
Adjust the Steering Tension Knob to provide enough tension to allow the motor to turn freely, yet remain in any position without being held or tighten the knob to place the motor in a preset position to leave your hands free for fishing.
Adjusting the Bracket
You can lock your motor in a vertical position, angle it for shallow water or tilt it completely out of the water.
- Firmly grasp the control head or composite shaft.
- Press the Quick Release Tilt Lever toward the shaft and hold to release the detent lock or T-bar to adjust the position of the mounting bracket.
- Tilt to any of the positions on the Lever Lock Mounting Bracket.
- Release the Quick Release Tilt Lever
Installing an External Transducer
Installation Steps:
- Mount the External Transducer according to directions provided with the transducer.
- Leave enough slack in the Transducer Cable between the Lower Unit and Control Head to allow the motor to properly stow and deploy.
- Use two Cable Ties to secure the Transducer Cable to the Shaft just below the Control Head.
- Run the Transducer Cable to the fish finder.
Resources