The Bluetooth Ulterra is available as a freshwater motor, the Bluetooth Riptide Ulterra is available as a saltwater motor. Both can be controlled with a foot pedal (available as an accessory for the Riptide Ulterra), remote, or compatible Humminbird (with i-Pilot Link installed on the motor.) All Ulterra and Riptide Ulterra motors come with i-Pilot or i-Pilot Link installed. If your motor has i-Pilot installed, you can upgrade to i-Pilot Link with an upgrade kit.
Jump to:
- Installation Considerations
- Mount Features
- Deploy the Ulterra with the Foot Pedal
- Trim the Ulterra with the Foot Pedal
- Stow the Ulterra with the Foot Pedal
- Stow from the Ulterra Motor
- Power and Battery Status
- Control the Ulterra with a Foot Pedal
- Bluetooth Ulterra Remote Options
- Using the i-Pilot Link Remote
- Using the i-Pilot Remote
- Using the Bluetooth Micro Remote
- Ulterra Serial Number Location
- Ulterra Dimensions
- Ulterra Foot Pedal Dimensions
- Resources
- Ulterra Videos
- Ulterra Manuals
- Riptide Ulterra Manuals
-
Heading Sensor Manual
- Heading Sensor Instructions (for motors with i-Pilot or i-Pilot Link)
- i-Pilot Link Manuals and Compatibility Chart
- i-Pilot Manuals and Compatibility Chart
- Sonar Compatibility Charts
Installation Considerations
When installing the Ulterra, we recommend following the instructions in the Ulterra Installation Guide. We also recommend a 60 amp circuit breaker. You may also want to consider using a Trolling Motor Plug as it will allow you to easily disconnect your motor from power when not in use or when charging the trolling motor batteries.
- It is recommended that the motor be mounted as close to the centerline of the boat as possible.
- Make sure the area under the mounting location is clear to drill holes and install nuts and washers.
- Make sure the motor rest is positioned far enough beyond the edge of the boat.
- The motor must not encounter any obstructions as it is lowered into the water or raised into the boat when stowed and deployed.
- When installing the Ulterra, we recommend following the instructions in the Ulterra Installation Guide. We also recommend a 60 amp circuit breaker
Click here for MKR-27 60 Amp Circuit Breaker purchase options. - Consider a quick release or adapter bracket with the installation of your motor. The button below will walk you through selecting the best Quick Release Bracket for your boat and motor.
- You may also want to consider using a Trolling Motor Plug as it will allow you to easily disconnect your motor from power when not in use or when charging the trolling motor batteries.
Click here for MKR-28 Trolling Motor Plug purchase options.
Mount Features
-
Motor Mount
The Motor Mount is designed to securely hold the motor in place on the deck of the boat. It functions to stow and lock the motor flat on the deck when not in use by providing secure stowage for transport. The motor mount also positions the motor when it is in the deployed position.
-
Motor Ramps
The Motor Ramps function to hold the Lower Unit in place when the motor is stowed. The Lower Unit will rest on the Motor Ramps when stowed, helping to secure it in place. -
Emergency Strap
The Emergency Strap must be used to place pressure on the motor shaft to hold the lower unit tightly against the Motor Ramps when the motor is manually stowed. The Emergency Strap should be secured every time the motor is manually stowed to prevent damage from high wind, rough water, or vibrations, including while the boat is trailered. See the “Manually Stowing the Ulterra” section of the manual for more information on when the Emergency Strap is needed. -
Belt Collar
The Belt Collar holds the lower portion of the Lift Belt in place. The Lift Belt runs along the motor Shaft and is used to stow and deploy the motor.
-
Indicator Panel
The Indicator Panel is located on the end of the Mount, by the Power Cables. Power to the motor is turned "on" and "off" through the Power button on the Indicator Panel. The LEDs on the Indicator Panel communicate the status of the motor.-
Power Button
The Ulterra must be powered “on” and “off” manually. On the Indicator Panel, press the Power button to turn the motor “on.” When the motor is powered on, the System Ready LED will illuminate green. To turn the motor “off,” press and hold the Power button for approximately three seconds until the green light turns off. The Ulterra has an auto-shutoff and will automatically power off after 90 minutes of inactivity in the stowed position. -
LED Patterns
-
Status
The Status LED will illuminate red when the motor is stowed and the Lower Unit is resting securely on the Motor Ramps. The Status LED will not be illuminated when the motor is deployed or the Lower Unit is off of the Motor Ramps. When the motor is stowing or deploying, the red Status LED will flash. -
System Ready
The System Ready LED will illuminate green when the motor is powered on and indicates normal operation. When the motor is powered off, the System Ready LED will not be illuminated. If the green light does not remain illuminated after power-up, this is an indication of insufficient voltage/power. For more information, refer to the "Advanced Troubleshooting" section of this manual.
-
Status
-
Power Button
Deploy the Ulterra with the Foot Pedal
- Locate the Indicator Panel at the base of the Mount.
- Make sure that the motor is on by checking that the green LED above the System Ready Indicator is on.
- On the Foot Pedal, press the Mode Button until the amber LED in the center of the Indicator Panel on the Foot Pedal is illuminated. This puts the Foot Pedal in Ulterra Mode.
- To deploy the motor when it is stowed, double press the Stow/Deploy button.
Trim the Ulterra with the Foot Pedal
Once the boat is on the water, it may be necessary to adjust the trim of the lower unit up or down to achieve an optimum depth for motor performance. When setting the depth of the motor, be sure the top of the motor is submerged at least 12" below the surface of the water to avoid churning or agitation of surface water. There will be times when you will need to move your motor up or down depending on how your boat is responding. You can trim up to avoid hitting underwater objects and you can trim down if your prop is coming out of the water.
When trimming the motor using the Foot Pedal, the motor is programmed to operate safely and limit prop rotation when it is within certain limits. The prop will temporarily stop while trimming the motor and resume once trimming is stopped. Trim limits are in place to avoid damage to the unit. An upper trim limit is set 12" from the bottom of the mount to the center of the lower unit. A lower trim limit is set approximately 1.5" from the bottom of the control head to the trim housing. A prop lockout region, defined as 14" from the bottom of mount to the center of the lower unit, is used to eliminate the possibility of the motor contacting the boat hull. All functions, with the exception of manual steer and track record, are canceled upon trimming into this region.
- To trim the motor up, press the Trim Up button located on the bottom left of the Foot Pedal.
- To trim the motor down, press the Trim Down button located on the bottom right of the Foot Pedal.
Stow the Ulterra with the Foot Pedal
- Locate the Indicator Panel at the base of the Mount.
- Make sure that the motor is on by checking that the green LED above the System Ready Indicator is on.
- On the Foot Pedal, press the Mode Button until the amber LED in the center of the Indicator Panel on the Foot Pedal is illuminated. This puts the Foot Pedal in Ulterra Mode.
- To stow the motor when it is deployed, press the Stow/Deploy button.
Note* - If your motor is stalling at a 45-degree angle when attempting to stow, this indicates that batteries are too low to fully stow the motor. If this occurs, re-engage power, deploy the motor, trim the motor to its highest setting, and turn power off until batteries can be recharged. Once batteries are charged, attempt to stow the motor again
Stow from the Ulterra Motor
In the unlikely event that your foot pedal, remote or i-Pilot or i-Pilot Link app becomes non-functioning, you can stow the Ulterra from the base of the motor.
- Locate the Indicator Panel at the base of the Mount.
- Make sure that the motor is on by checking that the green LED next to the System Ready Indicator is on.
- Press and hold the Power Button located on the Indicator Panel for ten seconds.
- The red and green LEDs next to the Status (red) and System Ready (green) Indicators will flash alternately, and the motor will begin to stow.
Power and Battery Status
If you notice your Minn Kota Ulterra or Riptide Ulterra losing power it's likely that your battery is running low. As you consume battery power, all Ulterra motors scale back on prop speed to ensure that there is enough power to stow your motor at the end of the day. This video also shows you how to find the battery level status on your i-Pilot remote.
Control the Ulterra with a Foot Pedal
The Ulterra Foot Pedal is dual function to allow you to control the motor without the remote. When the foot pedal is in “Ulterra” mode, the yellow Mode LED light will be illuminated. In this state the foot pedal toe buttons can be used to stow, deploy, and trim the motor. When it is in “Steering” mode, the yellow Mode LED will be off. In this state the foot pedal toe buttons can be used to control steering and prop on/off. In either state, the heel/toe pad can be used to control steering.
For additional detailed information on using the Foot Pedal, please click here.
-
Deploy the Motor
To deploy you motor with the foot pedal, press the Mode button on the foot pedal to turn on the Mode LED light. With the light on, double press the Stow/Deploy button. The double press is a built-in safety feature of the motor so it does not accidentally deploy. When you deploy the Ulterra, it will always deploy to the most recent depth that was used. You can refer to the stow/deploy section from the Ulterra manual, which can be downloaded by clicking here. -
Stow the Motor
To deploy you motor with the foot pedal, press the Mode button on the foot pedal to turn on the Mode LED light. With the light on, single press the Stow/Deploy button. Unlike when deploying the motor, you only have to press the stow button once and the motor will raise up to about 6 inches below the mount, tip over and then pull itself onto the motor ramps for stowing. The steps at the bottom of this page will show how to stow the motor without the foot pedal, or remote. You can refer to the stow/deploy section from the Ulterra manual, which can be downloaded by clicking here. -
Trim the Motor
To trim the motor up and down with your foot pedal, turn on the Mode LED Light with the Mode button and deploy the motor. With the motor deployed and the Mode LED Light on, you can now use the Trim Up and Trim Down arrow keys on the toe buttons of the foot pedal. We recommend having the top of the motor covered by at least 12 inches of water for proper operation. -
Turn the Prop on and off
When turning on the prop, the motor needs to be at least 18 inches below the mount. There is a lockout zone to prevent the motor from accidentally turning on and causing damage. To turn the prop on and off, you will want the Mode LED Light off. The prop can then be turned on and off by pressing the Prop On/Off button. -
Increase and Decrease Speed
To increase or decrease your speed with the foot pedal, the motor must be deployed and the prop on. Then using the Speed Control dial, you can increase the speed by turning the dial to a higher number. You can decrease speed by turning the dial to a lower number. -
Steer the Motor
To steer the motor left or right with the foot pedal, the motor must be deployed. If the Mode LED Light is off, you can use the right arrow toe button to turn the motor to the right and the left arrow toe button to turn the motor to the left. You can also steer right by pushing the toe of the foot pedal down and left by pushing on the heel of the foot pedal regardless of the state of the Mode LED Light.
Bluetooth Ulterra Remote Options
The Ulterra has 3 options for remotes shown below. The remote you have will determine how to use it. The Bluetooth Micro Remote is compatible with both i-Pilot Link and i-Pilot. Download the Quick Reference Guides for using the Ulterra with a Remote by clicking on the picture of your remote.
-
i-Pilot Link
-
i-Pilot
-
Bluetooth Micro Remote
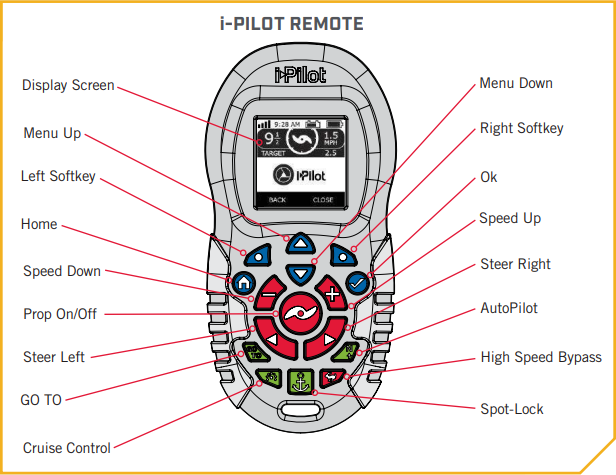
Using the i-Pilot Link Remote

-
Home
Press to bring up the Home Screen Buttons. -
Screen Navigation
Press to navigate the menu without touching the screen. Press and hold to lock and unlock the remote. -
Ok
Press to accept menu selections. Press to power remote on. Press and hold for 3 seconds to power remote off. -
Speed Up & Speed Down
Press to increase or decrease motor speed. -
Steer Left & Steer Right
Press to steer the motor to the left or to the right. -
Prop On/Off
Pressing this button will turn the Prop on and off. -
Spot-Lock
Press to enable and disable Spot-Lock.
Using the i-Pilot Remote
-
Turning the prop on and off
When turning on the prop, the motor needs to be at least 18 inches below the mount. There is a lockout zone to prevent the motor from accidentally turning on and causing damage. Using the remote, the prop can be turned on and off by pressing the prop button. -
Increasing and Decreasing Speed
To increase or decrease your speed with the remote, the motor must be deployed and the prop on. Then press the + button to increase your speed and the - button to decrease your speed. -
Steering the Motor
To steer the motor left or right with the remote, the motor must be deployed. You can use the right arrow button to turn the motor to the right and the left arrow button to turn the motor to the left.
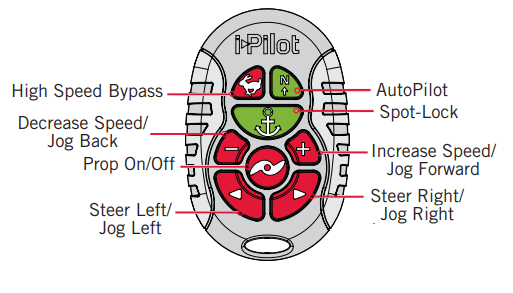
Using the Bluetooth Micro Remote
-
High Speed Bypass
Bypasses the current motor speed to speed 10. Double press to engage. Single press to disengage. -
Autopilot
Press to enable AutoPilot. The selection between Heading Lock and Course Lock must be made from either the fully functioning standard remote or the fish finder. -
Spot-Lock
Press to enable Spot-Lock. When Spot-Lock is enabled from the Micro Remote, use either the fully functioning standard remote or the fish finder if you want to save it. -
Increase Speed & Decrease Speed
Press to decrease or increase motor speed. -
Prop ON/OFF
This button is located in the middle of the remote. It turns the propeller on or off. Press the button once to turn the propeller ON; press button a second time to turn it OFF. The button does not need to be held down. -
Steer Left & Steer Right
These buttons are located to the right and left of the Prop ON/OFF button and have an arrow symbol. They cause the motor to turn in the desired direction as long as the button is held down. If the Steer Right or Steer Left button is held for more than seven seconds, the steering will automatically stop until the button is pressed again. -
Jog Back, Jog Forward, Jog Left, Jog Right
If your motor is Spot-Lock Jog enabled, the Speed Down (backwards), Speed Up (forward), Steer Right and Steer Left buttons function change to Jog the boat while in Spot-Lock. These buttons will then move your motor in 5' increments
Ulterra Serial Number Location
- The serial number is located inside the mount near the motor rests, this can be seen when the motor is stowed.
-
Ulterra and Riptide Ulterra Bow.pdf
Ulterra Dimensions
Ulterra Foot Pedal Dimensions
Resources
- Ulterra Videos
- Ulterra Manuals
- Riptide Ulterra Manuals
-
Heading Sensor Manual
- Heading Sensor Instructions (for motors with i-Pilot or i-Pilot Link)
- i-Pilot Link Manuals and Compatibility Chart
- i-Pilot Manuals and Compatibility Chart
- Sonar Compatibility Charts