This article give maintenance steps for you Minn Kota Electric Steer Motor.
After use, the entire motor should be rinsed with freshwater.
Jump to:
- Prop Maintenance
- Shaft Maintenance
- Motor Mount Inspection and Maintenance
- Motor Cable Management and Inspection
- Ulterra Care and Maintenance Tips
- Lower Unit Paint Maintenance
- Foot Pedal Maintenance
- Resources
The Prop must be inspected and cleaned from weeds and fishing line after every use. Fishing line and weeds can get behind the Prop, damage the seals and allow water to enter the motor.
- Disconnect the motor from all sources of power prior to changing the Prop.
- Hold the Prop and loosen the Prop Nut with a pliers or a wrench.
- Remove the Prop Nut and Prop Washer.
- Turn the old Prop to horizontal and pull it straight off. If the Drive Pin falls out, push it back in.
- Align the new Prop with the Drive Pin.
- Install the Prop Washer and Prop Nut.
- Tighten the Prop Nut 1/4 turn past snug at 25-35 inch-lbs.
Video Removing Prop, Inspecting Prop, and Drive Pin
Video Guide: How to Replace or Install a Trolling Motor Prop
In this video, we will show you how to replace or install a new trolling motor propeller, inspect the drive pin and lower unit seal, and a few tips for trolling motor props. The process is very simple and only requires minimal tools.
Purchase replacement parts here
Key times in the video
- 0:00 - Introduction
- 0:27 - Tools Needed
- 0:37 - How to Select the Correct Trolling Motor Prop, Drive Pin and Nut Kit
- 0:53 - Disconnect Trolling Motor from Batteries
- 1:06 - How to Remove an Old Trolling Motor Propeller
- 2:05 - Inspect Drive Pin and Seal
- 2:19 - Install New Trolling Motor Prop
- 3:11 - Reconnect Trolling Motor Power
- 3:19 - Learn More About Trolling Motor Props
Shaft Maintenance, Lubricating, and Cleaning
The Shaft requires periodic cleaning and lubrication for proper retraction and deployment. A coating of an aqueous based silicone spray will improve operation.
*Do not spray water into the ventilation openings in the head of the motor.
* Minn Kota does not recommend using oil-based lubricants like WD-40 because oil based sprays will attract dirt and debris that can cause issues.
- Disconnect the connections to battery.
- To lubricate your shaft, wipe the shaft with a rag or paper towel with the Pledge or Armor-All on it or spray the shaft down with the spray and wipe it to evenly coat the shaft.
- For prolonged storage, lightly coat all metal parts with an aqueous based silicone spray
Shaft Cleaning and Lubricating Video
Trolling Motor Battery Maintenance
- Disconnect the connections to battery.
- To keep battery terminals clean with fine sandpaper or emery cloth.
- For maximum battery life recharge the battery(s) as soon as possible after use. For maximum motor performance restore battery to full charge prior to use.
- When reconnecting terminals ensure connections are tight and batteries are secured.
Battery Inspection and Charging Video
- Video Guide: Battery Installation
- Click here for more on the Importance of Marine Battery Maintenance
- Click here for How to Charge a Deep Cycle Battery
- Click here for Finding the Right Charger
- Click here for Information on Using Minn Kota Chargers
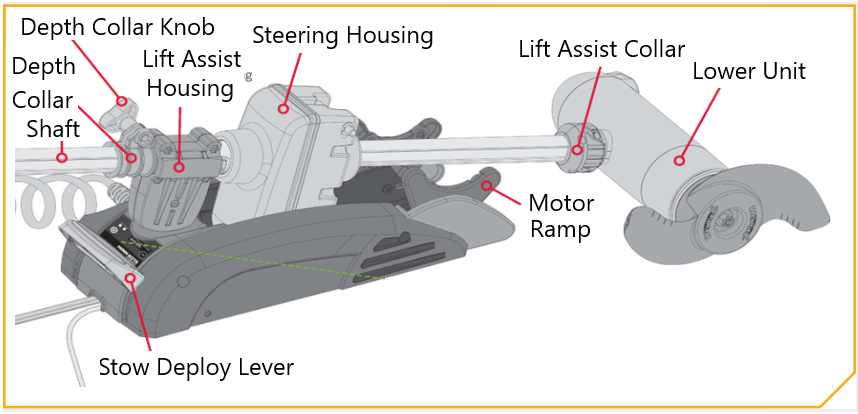
Motor Mount Inspection and Maintenance
- On Cable-Steer motors inspect the Pull Grip, Rope, Depth Collar and Hold-Down Strap before each use and replace if they shows signs of wear.
- One Electric-Steer motors inspect Stow and Deploy and Depth Collar to ensure they are free from damage.
- Inspect the mounting bolts to ensure they are secure.
- The rail covers on the motor rest are intended to be a wear item and may need to be a replaced periodically.
Trolling Motor Mount Inspection Video
Depth Collar Maintenance
-
Designed to hold the motor at the proper depth while deployed. It also functions to hold the Lower Unit in place when stowed while not in use and during transport.
Tightening The Depth Collar Knob
- The Depth Collar Knob is tightened by turning the knob clockwise and loosen by turning the knob counter clockwise.
-
Note: The Depth Collar should be secured against the Steering Housing when transporting the motor to prevent accidental deployment.
-
Note: The Depth Collar should be secured against the Steering Housing when transporting the motor to prevent accidental deployment.
Twist Knob Style Depth Collar Bow-Mount Terrova and Riptide Terrova with Lift Assist

Tightening the Depth Collar Knob
- The Depth Collar Knob is tightened by turning the knob clockwise and loosen by turning the knob counter clockwise.
-
The Depth Collar should be secured against the Lift Assist on when transporting the motor to prevent accidental deployment.
-
Motor Cable Management and Inspection
- Inspect foot pedal steering cables, networking cables, and transducer cables to ensure they are free for the motor to stow, deploy and other motor operation movements.
Cable Management Video
Ulterra Care and Maintenance Tips
- Ulterra Maintenance Video
- Ulterra Care Video
Lower Unit Paint Maintenance
Important: Always follow the manufacturer's instructions and safety guidelines for each product listed below.
-
Remove all loose paint
- Remove any loose paint by scraping it off.
- Sand the area to be painted with a medium grit sandpaper and blend in areas where the paint and substrate meet.
-
Clean the area to be painted (VERY IMPORTANT)
- A strong cleaner (paint thinner) that removes dirt and oils and does not leave any residue will work best.
- Before painting wiping the area with isopropyl alcohol to remove any remaining residues and moisture.
-
Apply Primer Coating
- Use an epoxy-based primer. This will give the strongest adhesion and corrosion resistance.
- Allow primary to dry completely per the manufacturer instructions.
-
Apply Final Coating
- Use an Acrylic based top coat. Acrylic spray paints offer UV resistance as well as durability. Again, the surface should be clean, dry, and free of any residues.
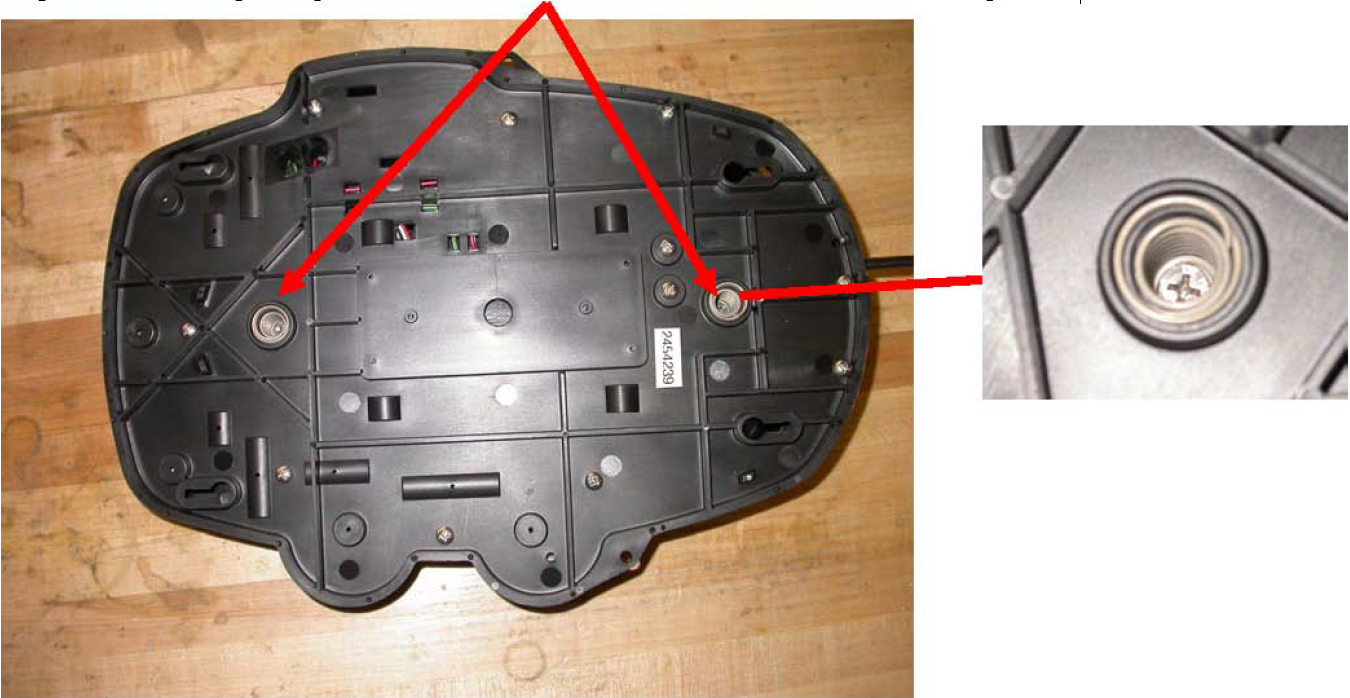
Foot Pedal Maintenance
This procedure applies to both Ulterra and Terrova foot pedals.
Step 1. Turn the foot pedal upside down and remove the two screws shown with a #2 Phillips screwdriver.
Step 2. Flip foot pedal over and lift heel/toe pedal off.
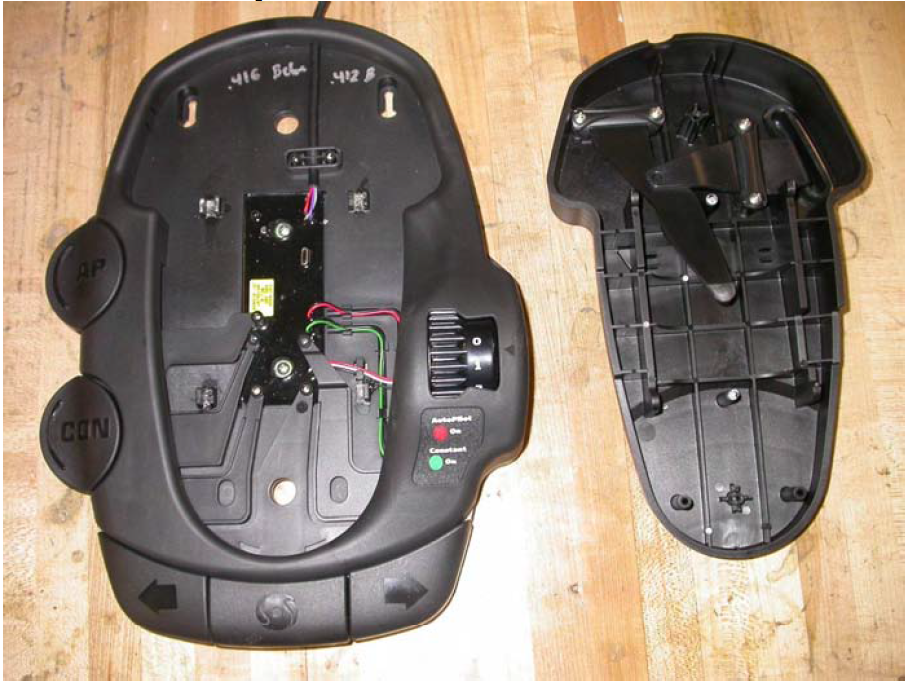
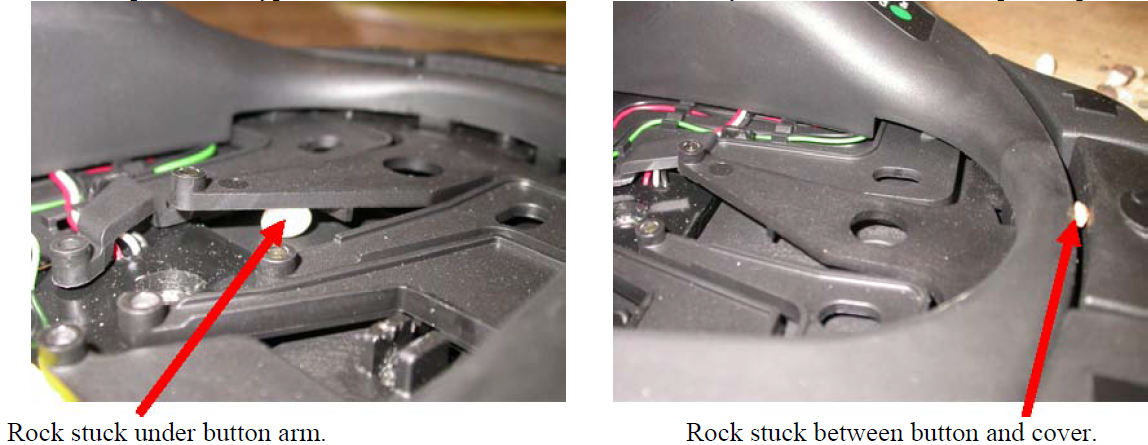
Step 3. Check for rocks, twigs, sand, or other debris that may be lodged under buttons or button arms. The foot pedal is
water proof and can be sprayed off with water to remove any foreign objects such as sand and rocks.
Below are pictures of typical locations debris can reside which may cause undesirable foot pedal operations.
Step 4. Once the foot pedal is clean the heel/toe pedal can be reinstalled with the original springs and Phillips screws.
If the steps above do not correct the issue then further diagnoses to the motor is needed, we recommend taking the motor to an Authorized Service Provider for repair.