The PowerDrive is available with a foot pedal, with i-Pilot, or in the case of the Riptide models, is available with CoPilot. i-Pilot and CoPilot are available as upgrade kits with the links below. If you have i-Pilot on your PowerDrive, you will not be able to use the foot pedal. If you have i-Pilot installed, the PowerDrive can only be operated by the i-Pilot Remote.
Jump to:
- i-Pilot Motors
- CoPilot
- Installation Considerations
- Motor Functions
- Adjusting the Latch Collar for a Secure Stow
- Using the Foot Pedal
- Bluetooth PowerDrive Remote Options (2017-2023)
- PowerDrive V2 Remote Options (2007-2016)
- Using the Bluetooth i-Pilot Remote
- Using the Legacy i-Pilot Link Remote
- Using the Legacy i-Pilot Remote
- Using the PowerDrive CoPilot Remote
- PowerDrive Serial Number Location
- PowerDrive V2 Mount Dimensions
- PowerDrive Foot Pedal Dimensions (2007- present)
- Installing External Transducer on PowerDrive (2017-2023) and PowerDrive V2 (2007-2016)
- Resources
- PowerDrive Manuals
- Riptide PowerDrive Manuals
- CoPilot Manual
-
Heading Sensor Manual
- Heading Sensor Instructions (for motors with i-Pilot)
- i-Pilot Manuals and Compatibility Chart
i-Pilot Motors
The PowerDrives with i-Pilot installed are not able to use a foot pedal along with the i-Pilot remote. There is an upgrade kit available to add i-Pilot to your PowerDrive (2017 or newer) if you would like to add i-Pilot to your motor. The links for ordering the upgrade kit and the i-Pilot Manuals are listed below.
- Upgrade Kit for Freshwater PowerDrive BT- part number 2774155
- Upgrade Kit for Riptide PowerDrive BT- part number 2774156
- i-Pilot Product Manual, English
- i-Pilot Quick Reference Guide, English
CoPilot
CoPilot gives you the ability to turn your prop on and off, increase or decrease your speed, and steer left or right. If you have CoPilot on your motor, you can use both the CoPilot remote and the foot pedal to control your motor. Click the link below if your motor came with a foot pedal and you would like to purchase the CoPilot.
- CoPilot System Accessory - PowerDrive (2017-2023)- item number 1866155
- CoPilot for PowerDrive Instructions
- CoPilot System Accessory - PowerDrive V2 (2007-2016)- item number 1866150
- CoPilot for PowerDrive V2 Instructions
Installation Considerations
When installing the PowerDrive, we recommend following the instructions in the PowerDrive Installation Guide. We also recommend a 60 amp circuit breaker if your PowerDrive has 50lbs of thrust or more. If it is below 50 lbs of thrust you will need a 50 amp circuit breaker. You may also want to consider using a Trolling Motor Plug as it will allow you to easily disconnect your motor from power when not in use or when charging the trolling motor batteries.
- PowerDrive Installation Guide
- PowerDrive Mounting Dimensions
- MKR-19 60 Amp Circuit Breaker
- MKR-27 60 Amp Circuit Breaker
- MKR-28 Trolling Motor Plug
Motor Functions

-
Deploy the Motor
Loosen the Depth Collar, then push firmly down on the Deploy-Assist Lever to release the Latch Collar and slide the motor forward, out from the Mount Ramp. Lower the motor to the desired depth. Make sure it clicks into a secure, vertical position. Once at the desired depth, slide the Depth Collar against the Steering Housing and tighten. -
Stow the Motor
Loosen the Depth Collar and depress the Tilt Lock Lever and raise the motor by pulling up on the composite shaft or control head. Pull the motor toward the stern until it rests securely on the Mount Ramp and the Deploy-Assist Lever captures the Latch Collar. Slide the Depth Collar down and secure it against the top of the Steering Housing to secure the motor in place and prevent accidental deployment. -
Trim the Motor
Once the boat is on the water, it may be necessary to adjust the Lower Unit up or down to achieve an optimum depth for motor performance. When setting the depth of the motor, be sure the top of the motor is submerged at least 12” below the surface of the water to avoid churning or agitation of surface water.
While holding the Shaft, loosen the Depth Collar Knob until the Shaft can slide up and down freely. Raise or lower the motor to the desired depth. Turn the motor control head to the desired position. Slide the Depth Collar against the Steering Housing and tighten the Depth Collar Knob to secure the motor in place. -
Push-To-Test Battery Meter
This motor is equipped with a Push-to-Test Battery Meter. The LED lights are located on the Indicator Panel on the Mount of the motor. The Battery Meter provides an accurate display of the remaining charge in the battery. It is only accurate when the motor is off. The meter reads as follows:- One light indicates recharge.
- Two lights indicate low charge.
- Three lights indicate good charge.
- Four lights indicate full charge.
Adjusting the Latch Collar for a Secure Stow
Once the motor has been used, it may be necessary to adjust the Latch Collar up or down. The ideal adjustment is a slightly loose fit that completely captures the Latch Collar in the Deploy Assist Lever when stowed.
- Before transporting the boat over water or land, stow the motor to determine where the Lower Unit rests on the Mount Ramp.
- If the Lower Unit does not sit on the Mount Ramps, refer to the Adjusting the Latch Collar section of this refer to the Adjusting the Latch Collar section of this help the Lower Unit stay on the Mount Ramps as it is captured by the Deploy Assist Lever.
Using the Foot Pedal
-
Momentary Button
The Momentary Button is located at the heel end of the foot pedal and is used to turn the propeller on. -
Momentary/Constant Switch
The Momentary/Constant Switch is used to toggle between Momentary and Constant Mode. During Momentary Mode (MOM), the propeller only turns while pressure is applied to the Momentary Button. While in Constant Mode (CON), the propeller will run continuously regardless of pressure being applied to the Momentary Button.
If a propeller encounters an obstruction while either in Momentary or Constant Mode, while the propeller is running, the increased electrical current being generated by the obstruction will signal the motor to decrease the power to the propeller to prevent damage. If the current overload is detected for more than 20 seconds, the prop will be disabled to prevent damage to the motor. In this event, the operator can turn the prop back on after being sure that the obstruction has been cleared.
-
Speed Control
The Speed Control dial is on the upper right side of the toe end of the Foot Pedal. Turn the Speed Knob forward to increase speed and backward to decrease speed. Speed can also be adjusted using the remote, if applicable. -
Steer Right and Steering Left
These buttons are located to the right and left of the Prop ON/OFF button and have an arrow symbol. They cause the motor to turn in the desired direction as long as the button is held down. If a steering button is held for more than seven seconds, the steering will automatically stop until the button is pressed again. -
Steering the Motor in Reverse
The propeller always turns in the forward direction. You can reverse the direction of thrust by turning the motor 180°.
Bluetooth PowerDrive Remote Options (2017-2023)
The Bluetooth PowerDrive has 2 options for remotes, i-Pilot or CoPilot. The remote you have will determine how to use it. Download the Quick Reference Guides for using the PowerDrive with a Remote by clicking on the picture of your remote.
PowerDrive V2 Remote Options (2007-2016)
The PowerDrive V2 has 3 options for remotes, Legacy i-Pilot Link, Legacy i-Pilot or CoPilot. The remote you have will determine how to use it. Download the Quick Reference Guides for using the PowerDrive with a Remote by clicking on the picture of your remote.
Legacy i-Pilot Link
Legacy i-Pilot
CoPilot
Using the Bluetooth i-Pilot Remote
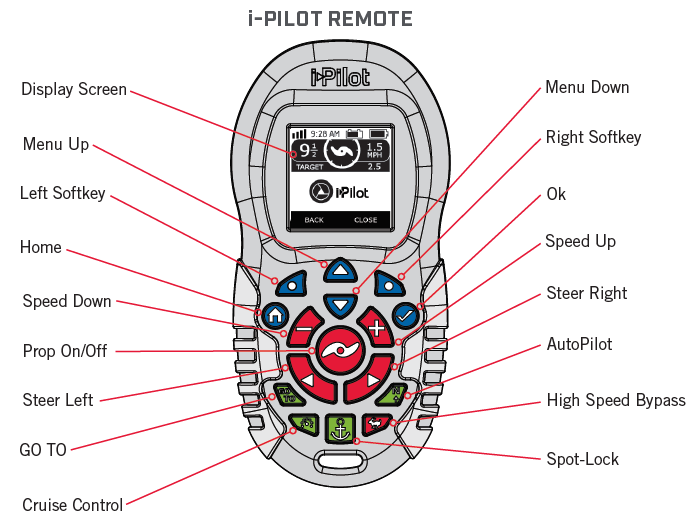
-
Turning the prop on and off
When turning on the prop, the motor needs to be at least 18 inches below the mount. There is a lockout zone to prevent the motor from accidentally turning on and causing damage. Using the remote, the prop can be turned on and off by pressing the prop button. -
Increasing and Decreasing Speed
To increase or decrease your speed with the remote, the motor must be deployed and the prop on. Then press the + button to increase your speed and the - button to decrease your speed. -
Steering the Motor
To steer the motor left or right with the remote, the motor must be deployed. You can use the right arrow button to turn the motor to the right and the left arrow button to turn the motor to the left.
Using the Legacy i-Pilot Link Remote
Cruise Control
-
Engaging Cruise Control
- Press the Cruise Control key on the remote.
- Press the Speed Up or Speed Down keys to adjust the target speed shown in the Target Gauge.
- Press OK to accept the target speed and engage Cruise Control.
-
Disengaging Cruise Control
- Press the Cruise Control key on the remote.
- Press the softkey marked Cancel.
Autopilot
-
Engaging Autopilot from the Remote
- Press the AutoPilot key on the remote.
-
Engaging Autopilot from the Humminbird
- Navigation X-Press Menu: Press the MENU key.
- Select AutoPilot and press the RIGHT Cursor key.
-
Adjusting Autopilot from the Remote
- Use the steering keys.
-
Adjusting Autopilot from the Humminbird:
- Navigation X-Press Menu: Press the MENU key.
- Select AutoPilot Adjust and press the RIGHT Cursor key.
- Adjust: Press the RIGHT or LEFT Cursor keys.
- Confirm: Press the CHECK/INFO key.
Waypoints
-
Mark a Waypoint Using the Remote
- To save a Waypoint at the boat’s position, press and hold the Spot-Lock key.
-
Mark a Waypoint Using the Humminbird
- To save a Waypoint at the boat’s position, press the MARK key.
- To save a Waypoint at the cursor position, use the 4-WAY Cursor Control key to move the active cursor to a position on the Chart View. Then, press the MARK key.
-
Navigate to a Saved Waypoint Using the Remote
- Press the GOTO key followed by the Waypoints softkey.
- Select a Waypoint from the list and press the OK key.
-
Navigate to a Saved Waypoint Using the Humminbird
- From the Chart View, press the GOTO key.
- Select a Waypoint from the list, and press the RIGHT Cursor key.
OR - Use the 4-WAY Cursor Control key to select a Waypoint or position on the chart.
- Press the GOTO key.
-
Disengage Navigating To A Waypoint From The Remote
- Switch to the GOTO Active Screen by pressing the GOTO key.
- Press the Cancel Softkey.
OR - Press the Steer Left or Steer Right key.
-
Disengage Navigating to a Waypoint from the Humminbird
- Navigation X-Press Menu: Press the MENU key.
- Select Cancel i-Pilot Navigation, and press the RIGHT Cursor key.
Spot-Lock
-
Mark a Spot-Lock and Engage Using the Remote
- Press the Spot-Lock key.
- Save (optional): Press the Save Softkey.
-
Mark a Spot-Lock at the Cursor Position Using the Humminbird
- Use the 4-WAY Cursor Control key to move the cursor to a position on the chart.
- Navigation X-Press Menu: Press the MENU key.
- Select Mark Spot-Lock, and press the RIGHT Cursor key.
- Press the EXIT key until the Navigation X-Press Menu is closed.
-
Engage Spot-Lock at the Boat Position Using the Humminbird
- Navigation X-Press Menu: Press the MENU key.
- Select Spot-Lock at Vessel, and press the RIGHT Cursor key. Spot-Lock will start immediately.
- Save (optional): Press the MENU key. Select Save Spot-Lock, and press the RIGHT Cursor key.
-
Mark a Spot-Lock and Start Navigation Using the Humminbird
- Use the 4-WAY Cursor Control key to move the cursor to a position on the chart.
- Navigation X-Press Menu: Press the MENU key.
- Select Spot-Lock at Cursor, and press the RIGHT Cursor key. Navigation will start automatically.
-
Engage Spot-Lock at a Waypoint Position Using the Humminbird
- Use the 4-WAY Cursor Control key to move the cursor to a Waypoint on the chart.
- Navigation X-Press Menu: Press the MENU key.
- Select the Waypoint name > Spot-Lock.
-
Navigate to a Saved Spot-Lock Using The Remote
- Press the GOTO key.
- Select a Spot-Lock from the list and press the OK key.
-
Navigate to a Saved Spot-Lock from the Humminbird
- Use the 4-WAY Cursor Control key to select a Spot-Lock icon on the chart.
- Press the GOTO key.
OR - Press the GOTO key.
- Select a Spot-Lock from the saved points list.
- Press the RIGHT Cursor key.
-
Disengage Spot-Lock from the Remote
- Switch to the Spot-Lock Active Screen by pressing the Spot-Lock key.
- Press the Cancel Softkey.
OR - Press any manual control key (steering, prop speed, prop on/off).
-
Disengage Spot-Lock from the Humminbird
- Navigation X-Press Menu: Press the MENU key.
- Select Cancel i-Pilot Navigation, and press the RIGHT Cursor key.
iTracks
-
Start Recording an iTracks from the Remote
- Home Screen > Controls > Record > OK.
-
Start Recording an iTracks from the Humminbird
- Main Menu: Press the MENU key twice.
- Select the Accessories tab.
- Select Record iTrack, and press the RIGHT Cursor key.
- Press the EXIT key until the menu system is closed.
-
Stop Recording an iTracks from the remote
- Record Active Screen > StopRec softkey > Save or Discard.
-
Stop Recording an iTracks from the Humminbird
- Navigation X-Press Menu: Press the MENU key.
- Select Stop Recording iTrack, and press the RIGHT Cursor key. Save Yes or No.
-
Navigate an iTrack from the Remote
- Press the GOTO key followed by the iTracks softkey.
- Select an iTrack from the list and press either the To Start or To End softkey.
-
Navigate an iTrack from the Humminbird
- Use the 4-WAY Cursor Control key to select a Start Track icon, End Track icon, or a position on the iTrack.
- Press the GOTO key.
- Use the 4-WAY Cursor Control key to select one of the submenu actions: Navigate to Start; Navigate to End.
OR - Press the GOTO key.
- Select an iTrack Start or iTrack End from the GOTO list.
Backtrack
- Humminbird Navigation X-Press Menu: Press the Menu key
- Select BackTrack.
- Note that BackTrack will create and save an iTrack using up to the last 2 miles of the Current Track. It will also automatically engage navigation towards the End point of the iTrack.
Routes
-
Create a Route on the Humminbird
- In a Chart View, use the 4-WAY Cursor Control key to select a Waypoint, Spot-Lock or position on the chart view.
- Press the GOTO key.
- To add more points to the route, repeat steps 1 and 2.
- Save (optional): Press the MENU key. Select Save Current Route and press the RIGHT Cursor key.
-
Navigate a Route from the Humminbird
- Main Menu: Press the MENU key twice.
- Select the Nav tab.
- Select Waypoints, Routes, Tracks and press the RIGHT Cursor key.
- Use the 4-WAY Cursor Control key to select the route to be navigated and press the RIGHT Cursor key.
- From the menu, use the 4-WAY Cursor Control key to select Travel, then select Forward or Reverse.
Follow the Contour
-
Engage Follow the Contour from the Humminbird:
- Use the 4-WAY Cursor Control key to move the cursor to a LakeMaster contour line.
- Press the GOTO key.
- Using the 4-WAY Cursor Control key, perform the following selections:
- Select Contour Offset to set the offset if desired.
- Select a navigation direction.
- Set the Contour Offset During Navigation
- Navigation X-Press Menu: Press the MENU key.
- Select Contour Offset.
- Press the RIGHT or LEFT Cursor keys to set the Offset.
High Speed Bypass
-
Engage High Speed Bypass
- Press the High Speed Bypass softkey on the home screen to set the motor speed to maximum. The rabbit icon will change to the revert icon.
-
Disengage High Speed Bypass
- Press the Revert softkey to disengage High Speed Bypass and send you back to your previous speed.
OR - Press the Speed Down key to disengage the High Speed Bypass and lower your speed from the maximum speed.
- Press the Revert softkey to disengage High Speed Bypass and send you back to your previous speed.
Using the Legacy i-Pilot Remote
Engaging Spot Lock
- Press the Spot Lock button on the remote.
- The Memory Location icon will flash on the remote LCD for three seconds, allowing you to choose a memory location by pressing the Speed Up or Speed Down buttons. Pressing the Spot Lock button again or waiting for three seconds accepts the memory location.
Disengaging Spot Lock
- To disengage Spot Lock press any of these buttons: Prop On/Off, Steer Right, Steer Left, Speed Up, Speed Down or Spot Lock.
Re-Engage a Saved Spot Lock Location
- Manually navigate the boat to within a quarter mile of the saved Spot Lock location. Due to safety reasons, i-Pilot will not re-engage a saved Spot Lock location greater than a quarter mile away.
- Press the Spot Lock Recall button on the remote.
- The Memory Location icon will flash on the remote LCD for three seconds allowing you to choose a memory location by pressing the Speed Up or Speed Down buttons. Pressing the Spot Lock Recall button again or waiting for three seconds accepts the memory location.
Spot Lock Escape
- If the Spot Lock button is accidentally hit, press the Record Pause/Escape button or any manual navigation button within three seconds to cancel the command.
Engaging Cruise Control
- Press the Cruise Control button on the remote.
- The current GPS speed will flash, displaying your current speed as the target GPS speed on the remote LCD for three seconds.
- Press the Speed Up or Speed Down buttons to increase or decrease the target speed or press the Cruise Control button again to engage Cruise Control immediately.
Disengage Cruise Control
- Pressing the Cruise Control button will disengage Cruise Control.
Adjusting Target Speed with Cruise Control Engaged
- With Cruise Control engaged press the Speed Up or Speed Down buttons to adjust the target speed by 0.1 MPH increments.
Engaging Advanced Autopilot and Autopilot
- To engage Advanced AutoPilot, press the AutoPilot button once. To engage AutoPilot, press and hold the AutoPilot button for two seconds.
- The Advanced AutoPilot or AutoPilot icon will be displayed on the remote LCD.
- To adjust desired heading, manually steer motor to new heading. i-Pilot will lock onto new heading.
Recording a Track
- Press the Record button on the remote.
- The Memory Location icon will flash on the remote LCD for three seconds, allowing you to choose a memory location by pressing the Speed Up or Speed Down buttons. Pressing the Record button again or waiting for three seconds accepts the memory location.
- The REC icon will be displayed on the remote LCD. Remember this will be the start point on the track.
- Navigate the boat along the desired path or course. AutoPilot and/or Cruise Control can be used while recording a track.
- Press the Record button on the remote again to stop the recording. The recording will end automatically if the two-mile distance limit is reached for the track or if one of the following buttons are pressed: Spot Lock, Spot Lock Recall, Track to End or Track to Start.
Pause and Resume a Recording
- While recording a track press the Record Pause/Escape button.
- The record icon will flash on the remote LCD.
- i-Pilot has now paused the recording of the track.
- If the boat moves farther than a quarter mile from where the Record Pause/Escape button was pressed, the recorded track will be ended and saved to the memory location previously selected.
- When ready to resume recording, navigate the boat just ahead of where the Record Pause/Escape button was pushed. Failure to do this may cause erratic play back of a track.
- Push the Record Pause/Escape button.
- The record icon will stop flashing on the remote LCD.
- i-Pilot is now recording again and adding to the track that was paused.
Replaying a Track (Track to Start / Track to End)
- Manually navigate the boat to within a quarter mile of the saved track. Due to safety reasons, i-Pilot will not re-engage a saved track greater than a quarter mile away.
- Press the Track to Start or Track to End button on the remote.
- The Memory Location icon will flash on the remote LCD for three seconds, allowing you to choose a memory location by pressing the Speed Up or Speed Down button. Pressing the button pressed in step 2 again or waiting for three seconds accepts the memory location.
- Adjust motor speed to desired setting to engage and navigate track automatically.
Record, Track to End and Track to Start Escape
- If the Record, Track to Start or Track to End button is accidentally hit, press Record Pause/Escape button within three seconds on the remote to cancel the command.
Using the PowerDrive CoPilot Remote
-
Turn the prop on and off
This button is located in the middle of the remote. It turns the propeller on or off. Press the button once to turn the propeller ON and press the button a second time to turn the propeller OFF. The button does not need to be held down. -
Increase and Decrease Speed
The Increase Speed and Decrease Speed buttons are located on the top of the remote and are identified with a positive and negative symbol. Pressing and releasing these buttons causes the speed to increase or decrease by one level. The speed is adjustable from level 0-10. At level 0, the prop will not turn.
In audio mode 2, an audible beep is heard for each step change in speed. Attempting to go higher than speed 10 or lower than speed 0 will result in the speed not changing and no beep will be heard. See the Audio Mode section for more information.
If the receiver senses no foot pedal or remote operation for 1 hour, the remote speed setting is automatically set to zero. This helps prevent unintentional activation of the propeller if the PROP ON/OFF remote button is inadvertently pressed. -
Steer the Motor
These buttons are located to the right and left of the Prop ON/OFF button and have an arrow symbol. They cause the motor to turn in the desired direction as long as the button is held down. If a steering button is held for more than seven seconds, the steering will automatically stop until the button is pressed again. -
Operat with the CoPilot Remote and Foot Pedal
- When the Momentary/Constant Switch on the foot pedal is in the CON position OR when the Momentary button on the foot pedal is held down, the receiver WILL NOT RESPOND to any remote commands. When the remote commands are received, the receiver will emit an audible chirp. This indicates the remote is functioning properly but the foot pedal is active and overriding the remote.
- When the Momentary/Constant Switch is in the MOM position, you can use the remote.
- As soon as any button is pressed, the initial speed setting will be set to approximately the same value as the Speed Control on the foot pedal. The prop will not automatically turn on until the Prop ON/OFF button on the remote is pressed.
- Pressing the Momentary Button on the Foot Pedal or adjusting the Speed Control dial will override the remote and receiver function. Control of the motor will automatically go to the Foot Pedal. The prop speed will also revert to the current value if the Speed Control dial on the Foot Pedal.
- If the foot pedal is not being used, the CoPilot receiver will always react to any commands from the CoPilot remote.
CoPilot Audio Modes
There are 3 receiver Audio Modes available. The unit is factory set to Audio Mode 2. To switch from one mode to another, simultaneously press and hold the increase and decrease speed buttons for 1 second. The receiver will respond with 1, 2, or 3 audible beeps indicating the corresponding receiver audio mode change.
PowerDrive Serial Number Location
- The serial number is located inside the mount near the motor rests, this can be seen when the motor is stowed.
PowerDrive V2 Mount Dimensions
PowerDrive Foot Pedal Dimensions (2007- present)
Installing External Transducer on PowerDrive (2017-2023) and PowerDrive V2 (2007-2016)
Your trolling motor may be pre-installed with a Universal Sonar 2 transducer system. For compatibility and more information on Universal Sonar, please visit Click here for Universal Sonar 2 Compatibility. An external transducer is not included with your trolling motor. An external transducer can be installed onto the motor.
Installation Steps:
- Mount the External Transducer according to directions provided with the transducer.
- Leave enough slack in the Transducer Cable between the Lower Unit and Motor Control Head to allow the motor to properly stow and deploy.
- Use two Cable Ties to secure the Transducer Cable to the Shaft just above the Latch Collar and just below the Motor Control Head.
- Run the Transducer Cable through the Coil Cord to the fish finder.
Resources
- PowerDrive Manuals
- Riptide PowerDrive Manuals
- CoPilot Manual
-
Heading Sensor Manual
- Heading Sensor Instructions (for motors with i-Pilot)
- i-Pilot Manuals and Compatibility Chart