The One-Boat Network mobile app allows you to operate the trolling motor from your paired mobile device. The motor must have Advanced GPS Navigation installed. The Trolling Motor App is dynamic and will change depending on which motor you have connected.
Jump to:
- Pair the Mobile Device to the Trolling Motor
- One-Boat Network App Buttons and Motor Controls
- What’s on the Display
- App Buttons
- Propeller Controls
- Navigation Controls
- Change Motor Settings
- Motor Settings
- Manuals
Pair the Mobile Device to the Trolling Motor
Once you have signed in to the One-Boat Network App, the app will walk you through connecting your mobile device to your Humminbird and Minn Kota devices.
- Enable Bluetooth on the Mobile Device
- Open the Settings menu.
- Select Bluetooth.
- Select On and keep the Bluetooth menu open and proceed to the next procedure.
- Enable Pairing Mode on the Trolling Motor: Press and hold the Pair PAIR button on the trolling motor Control Head. The trolling motor will emit a continuous tone while in Pairing Mode.
- Navigate to the Bluetooth Settings on your mobile device.
- Select “Minn Kota Controller 4.0” under the Bluetooth Device List. It may take a moment for the trolling motor to appear in the menu. Continue to hold the Pair button during this process.
- The trolling motor will emit 3 beeps when the pairing is successfully completed and you may release the Pair button. If 30 seconds pass while in Pairing Mode and they do not successfully pair, an error tone will sound from the trolling motor Control Head, signaling that the pairing has timed out. If unsuccessful, repeat the process.
The One-Boat Network mobile app allows you to operate the trolling motor from your paired mobile device. The Trolling Motor App is dynamic and will change depending on which motor you have connected.
The following informational data is displayed on the Motor View.
Interactive Buttons on the Motor App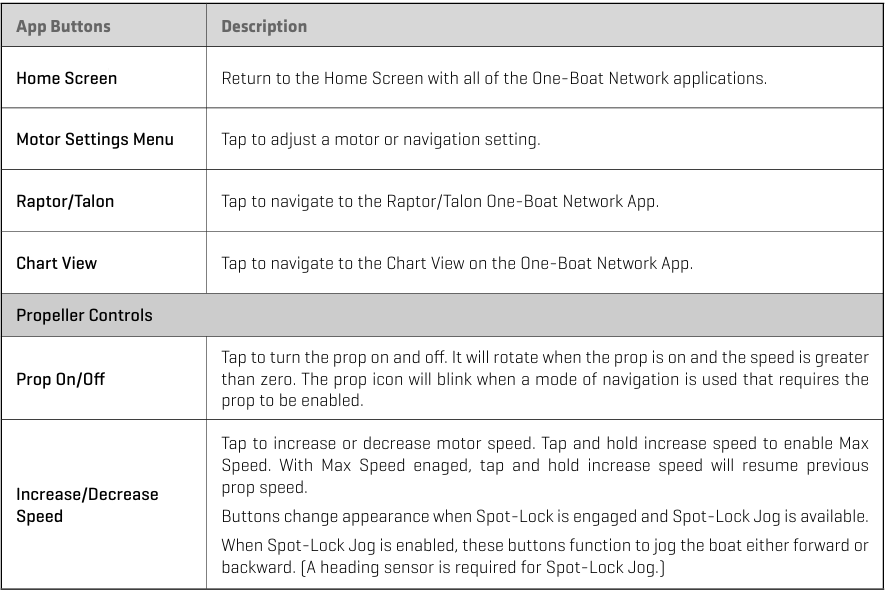
One-Boat Network App Buttons and Motor Controls
The following informational data is displayed on the Motor View. Become familiar with the interactive buttons on the Motor App. You can use these buttons to view different parts of the One-Boat Network App and to navigate your motor.
What’s on the Display
-
Prop Speed
- Displays the current Prop Speed, which can be adjusted in 1/2 speed increments between 0 and 10.
-
Speed Over Ground (SOG)
- Displays the current speed over ground.
-
Depth
- Displays the current water depth based on communication with the Humminbird control head.
-
Temperature
- Displays the current water temperature based on communication with the Humminbird control head.
-
Navigational Data Bar
- Displays dynamic navigation graphics, depending on which navigation method is in use.
- The left graphic displays the boat heading up, or when it navigation mode, it displays the navigational course line.
- The right graphic displays the orientation of the motor in relation to the keel.
-
Battery (only available on select trolling motors)
- Displays the estimated motor battery life when the prop is disengaged.
App Buttons
-
Home Screen
- Return to the Home Screen with all of the One-Boat Network applications.
-
Motor Settings Menu
- Tap to adjust a motor or navigation setting.
-
Raptor/Talon
Tap to navigate to the Raptor/Talon One-Boat Network App. -
Chart View
Tap to navigate to the Chart View on the One-Boat Network App.
Propeller Controls
-
Prop On/Off
- Tap to turn the prop on and off. It will rotate when the prop is on and the speed is greater than zero.
- The icon will blink when a mode of navigation is used that requires the prop to be enabled.
-
Increase/Decrease Speed
- Tap to increase or decrease motor speed.
- Tap and hold increase speed to enable Max Speed. With Max Speed engaged, tap and hold increase speed will resume previous prop speed.
- Buttons change appearance when Spot-Lock is engaged and Spot-Lock Jog is available.
- When Spot-Lock Jog is enabled, these buttons function to jog the boat either forward or backward. (A heading sensor is required for Spot-Lock Jog.)
-
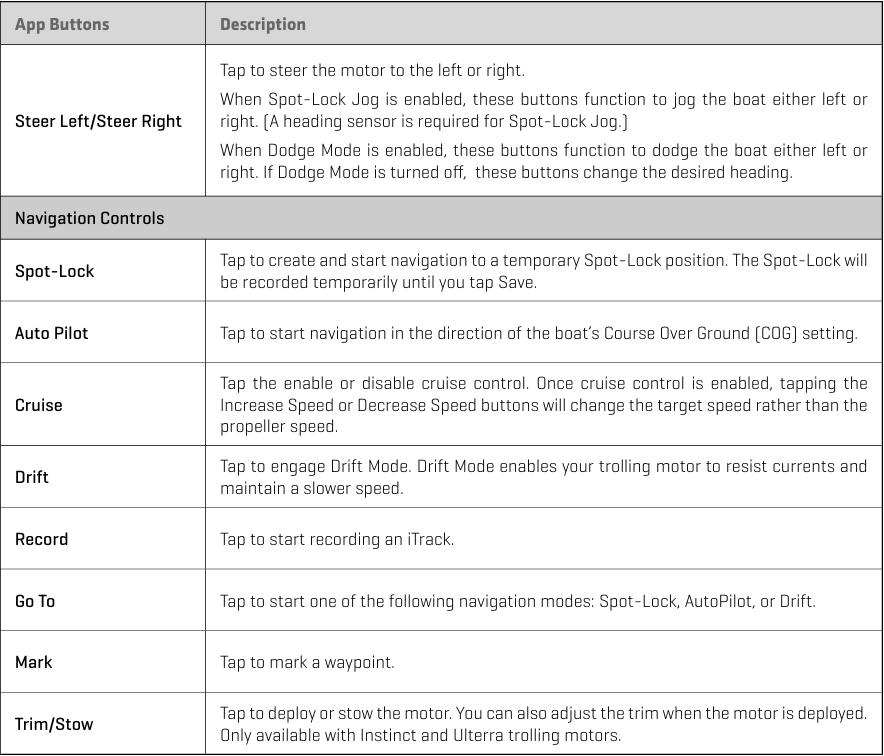
Steer Left/Steer Right
- Tap to steer the motor to the left or right.
- When Spot-Lock Jog enabled, these buttons function to jog the boat either left or right. (A heading sensor is required for Spot-Lock Jog.)
- When Dodge Mode is enabled, these buttons function to dodge the boat either left or right. If Dodge Mode is turned off, these buttons change the desired heading.
Navigation Controls
-
Spot-Lock
- Tap to create and start navigation to a temporary Spot-Lock position. The Spot-Lock will be recorded temporarily until you tap Save.
- The Advanced GPS Navigation Go To features including Spot-Lock Locations, i-Tracks, Waypoints, or Routes can be accessed only through the Advanced GPS Navigation Full Size Wireless Remote or a connected Humminbird fish finder with Motor Sync turn “On”. Currently, the Go To functionality for Spot-Lock Locations, i-Tracks, Waypoints and Routes is not part of the One-Boat Network App.
- Note: Up to 20 Spot-Lock or Waypoint locations can be recorded and up to 20 iTracks can be recorded and saved to the trolling motor, from the Advanced GPS Navigation Wireless Remote, the One-Boat Network App in Motor Controls or a connected Humminbird fishfinder. If the trolling motor is not connected to a Humminbird fish finder, a Wireless Remote must be used to engage and navigate the Go To data. Once the storage is full in the Advanced GPS Navigation system, the remote will display a Storage Full error screen. See Restoring My Data in the Owner’s Manual on how to delete some or all data to save more locations in the Advanced GPS Navigation system.
- If the Advanced GPS Navigation equipped trolling motor is connected to a Humminbird fish finder with Motor Sync “On” and the storage becomes full, the remote will display a notification and the data will be forwarded and saved to the connected Humminbird fish finder. This data can be engages and navigated through the Go To function on the fish finder. Waypoints saved on the One-Boat Network App in Chart View map do not transfer to Advanced GPS Navigation system or show on the Full Size Wireless Remote. When connected to a compatible Humminbird fish finder the follow limits for i-Tracks, Waypoints, and Spot-Lock locations can be saved through the One-Boat Network App:
- i-Tracks: 50
- Waypoint and Spot-Lock Locations: 10000
-
Auto Pilot
- Tap to start navigation in the direction of the boat’s Course Over Ground (COG) setting.
-
Cruise Control
- Tap the enable or disable cruise control.
- Once cruise control is enabled, tapping the Increase Speed or Decrease Speed buttons will change the target speed rather than the propeller speed.
-
Drift Mode
- Tap to engage Drift Mode.
- Drift Mode enables your trolling motor to resist currents and maintain a slower speed.
-
Record
- Tap to start recording an iTrack.
-
Go To
- Tap to start one of the following navigation modes: Spot-Lock, AutoPilot, or Drift.
-
Mark
- Tap to mark a waypoint.
-
Trim/Stow (only available with Instinct and Ulterra trolling motors.)
- Tap to deploy or stow the motor. You can also adjust the trim when the motor is deployed.
Motor Settings
-
Go To
- Tap to start one of the following navigation modes: Spot-Lock, AutoPilot, or Drift.
- When Spot-Lock is engaged, tap to Cancel Navigation or Save Spot-Lock.
- When AutoPilot or Drift are engaged, tap to Cancel Navigation, Adjust Course, or Reverse Navigation.
- The Advanced GPS Navigation Go To features including Spot-Lock Locations, i-Tracks, Waypoints, or Routes can be accessed only through the Advanced GPS Navigation Full Size Wireless Remote or a connected Humminbird fish finder with Motor Sync turn “On”. Currently, the Go To functionality for Spot-Lock Locations, i-Tracks, Waypoints and Routes is not part of the One-Boat Network App.
-
AutoPilot Mode
- Tap to select the AutoPilot mode: Locked Heading or Locked Course.
- Locked Heading uses an internal compass to provide a heading lock. It keeps the motor pointed in the same compass direction. If a manual steering correction is made, this mode locks onto the new compass heading to which the boat was steered.
- Locked Course not only uses compass heading but also GPS data to correct for cross winds, current and other external forces to keep the boat on the intended course. This mode generates a set of GPS points in a straight track line in the heading direction.
-
Arrival Mode
- This setting controls what Advanced GPS Navigation does once certain navigation modes are complete. Arrival Mode affects Go To functions for iTracks, waypoints, routes and Spot-Locks. There are four arrival modes
- Prop Off: Once navigation is finished, the Prop will turn off. You must be prepared to take manual control of the boat.
- Spot-Lock: After the boat has completed navigation, the system will create and engage a Spot-Lock.
- AutoPilot: Once navigation is finished, the system will continue navigating in AutoPilot in the final direction the boat was navigating.
- Auto Deploy Raptor/Talon: After the boat has completed navigation, the system will deploy the Raptor/Talon.
-
Eco Mode (only available on QUEST series trolling motors)
- Tap the Eco Mode slider to turn Eco Mode on or off. Turning on Eco Mode saves battery by reducing power consumption.
- Tap Low Battery to turn on the following Eco Mode notification when battery is below 20 percent: “Your battery is below 20%. Would you like to turn Eco Mode on?”
- Tap Full Battery to turn on the following Eco Mode notification when battery is above 80 percent: “Your battery is above 80%. Would you like to turn Eco Mode off?”
-
Foot Pedal (only available on QUEST series trolling motors)
- Tap to customize the One-Boat Button on your Foot Pedal.
-
Prop Auto-On
- When Prop Auto-On is turned on, the Advanced GPS Navigation will start the selected navigation mode as soon as it is selected. The propeller will turn on at the current speed setting. If the Prop Auto-On menu is turned on, but the propeller is not turning, the speed might be set to 0.
- When Prop Auto-On is turned off, you must start the propeller manually each time you select an Advanced GPS Navigation mode. However, this menu does not apply to SpotLock, Cruise Control or Drift Mode. These navigation modes will turn on the propeller as soon as they are engaged, regardless of the Prop Auto-On setting.
-
Straight Ahead on Deploy (only available on QUEST series trolling motors)
- Tap to turn Straight On Deploy on or off. Turning Straight On Deploy “on” adjusts the position of the Lower Unit to the Keel Offset position.
-
Audio Mode
- Tap to select one of two audio modes: Alarms Only or All Sounds.
-
Motor LED Brightness (only available on QUEST series trolling motors)
- Tap and drag the slider, or tap the plus (+) or minus (-) signs, to adjust the brightness on the motor LED display.
-
Dodge
- Turn on/off Dodge mode.
-
GPS Status
- Displays GPS status.
-
Manage Bluetooth Devices
- Tap to display all Bluetooth connections.
-
Setup and Calibration
- Tap to adjust for boat scale, stow orientation and keel mount offset. For trolling motors with an External Heading Sensor, it also calibrates and sets Heading Offset.
- Boat Scale: Tap and slide to adjust the boat scale so that the trolling motor has the appropriate amount of thrust for the size of the boat. For an installation where the motor thrust is undersized for the boat, increase the boat scale. For an installation where the motor thrust is oversized for the boat, decrease the boat scale. After setting the Boat Scale, tap on the arrow in the top-left corner of the screen for "Return to Home Screen". Your Boat Scale setting will automatically save.
- Stow Orientation: Tap to change the stow orientation to Prop Left or Prop Right or vice versa to match your installation configuration.
- Keel Mount Offset: Tap to adjust the position of the motor in relation to the Keel.
- Heading Offset: Tap to set the difference between the angle of the Keel of the boat and the angle at which the Heading Sensor is mounted to the deck of the boat.
-
Error Codes (only available on QUEST series trolling motors)
- If a QUEST series trolling motor senses an error, it will send a signal to the One-Boat Network App, and a red banner will appear on the display screen.
- Tap Error Codes in the pop-up menu or go to Motor Settings Error Codes to view the associated Error Code, and then reference the Error Code Table in this manual to resolve the error.
-
Demo Mode
- Turn on/off Demo mode.
-
Diagnostics
- Tap to display motor diagnostic information.
Change Motor Settings
Use the following instructions to customize the motor and navigation settings.
- Tap the Menu icon in the top, right corner.
- Select a menu option. Press and drag the slider, or tap the plus (+) or minus (-) signs, to adjust the setting.
Adjusting the Boat Scale with One Boat Network App
Adjust Boat Scale Trolling motor performance can be impacted by factors including, but not limited to, wind, water conditions, boat specifications, battery health, wiring, etc. Boat Scale provides a method of adjusting how the trolling motor will perform to account for these and other variables. The Minn Kota trolling motor comes from the factory with Boat Scale set to zero. This can be adjusted either up (+2) or down (-2) to increase or decrease the way the motor control software will apply power while using a navigation mode like Spot Lock.
An example of needing to reduce Boat Scale would be when the motor is over correcting or making many frequent adjustments while using Spot-Lock. In this case, try reducing Boat Scale -1 to reduce this behavior. If the behavior continues, reduce Boat Scale to -2. The opposite of this would be while using Spot-Lock, the motor is drifting away from its target location frequently or is struggling to make corrections. In this case, try increasing Boat Scale to +1 to help improve the motor’s accuracy. If the behavior continues, increase Boat Scale to +2.
- Tap Motor from the Home screen to access the Motor view.
- Tap the Menu icon in the top, right corner to open Motor Settings.
- In the Motor Settings menu, find and tap Setup and Calibration.
- In Setup and Calibration, use the slider under Boat Scale to adjust the Boat Scale from -2 to +2.
Stow Orientation
- Tap Motor from the Home screen to access the Motor view.
- Tap the Menu icon in the top, right corner to open Motor Settings.
- In the Motor Settings menu, find and tap Setup and Calibration.
- In Setup and Calibration, find and tap Stow Orientation.
- Tap the radial button for either Prop Right or Prop Left.
.