The steps below will walk you through pairing two Talons together, pairing to a remote, and clearing paired devices from the Talon.
Jump to:
- Pair your Bluetooth Talons Together and Program the Mounting Location
- Pair a Remote to one Bluetooth Talon
- Pair a Remote to two Bluetooth Talons
-
Pair a Mobile Device
-
Pair the Bluetooth Talon Foot Switch to one Bluetooth Talon
-
Pair a Wireless Stomp Switch to one Bluetooth Talon
- Pair Talon to Humminbird Fish Finder
- Clear Paired Devices from Bluetooth Talons
- Clear Bluetooth Talons from the Paired Remote
- Clear Bluetooth Talons from the Paired Android
- Clear Bluetooth Talons from the Paired Apple iOS
- Clear Bluetooth Talons from the Paired Wireless Stomp Switches
- Troubleshoot Pairing Issues for Bluetooth Talons
- Resources:
- Talon Owner's Manual
- Talon Operation Instructions from Humminbird SOLIX & HELIX units
- Talon Footswitch Instruction Manual
- Talon Videos
- Using the Bluetooth Talon Shallow Water Anchor (2018-present)
- Using the One-Boat Network App to Control your Bluetooth Talon (2018-present)
- One-Boat Network App - Install, Create Account, Sign-in, Forgot Password (Android and iOS) (2023-present)
- One-Boat Network App Operations Guide
Pair your Bluetooth Talons Together and Program the Mounting Location
Bluetooth Talons need to be paired together to be controlled by the same remote/foot switch/phone app/ or Stomp Switches. They are not able to pair with an older Talon (2017 and older). Click the links at the bottom of the page for information on pairing an older Talon or pairing your Bluetooth Talon(s) to a Talon Remote, Foot Switch, Stomp Switches, i-Pilot or i-Pilot Link, or the One-Boat Network App (available for both Android and iOS).
Every Talon comes direct from the factory with a remote already paired to the Talon. However, any Talon can be paired with up to 3 devices per Talon. When a boat has two Bluetooth enabled Talons installed, it is necessary to pair both Talons together, and to program which side of the boat each Talon is installed on. The process below is used to pair the Talons together, and to designate which side of the boat the each Talon is installed on. When the process is complete, all remotes that were paired to an individual Talon will now operate both Talons. If not, please see the "Pairing a remote to two Talons" section of this manual. Adding more than 3 devices per Talon may affect communication within the Bluetooth network.
- Retract the anchor on both Talons by pressing the Up button on each Talon.
- Once both Talons are fully retracted, press and hold the Up button and the Down button on the Indicator Panel of one Talon. Once the Depth Indication LEDs on the Indicator Panel begins to flash blue, release the buttons. Immediately follow this step on the second Talon.
- Once the buttons are released, the Talons are in Pairing Mode and will search for each other for 20 seconds. If they do not Pair after 20 seconds, an error tone will sound signaling that the Pairing has timed out. If this occurs, double check that the Talons are fully retracted and start the process again.
- If the Talons successfully Pair, a confirmation tone with three fast beeps will occur. At this point, the Talons have successfully paired, and now need to be programmed to designate the Port or Starboard locations.
- The Mode Indicator LED will turn green on both Talons. On the Indicator Panel of the Starboard Talon, press the Up button. The Talon will accept the selection. The Talon on the Port side will flash red and then the LEDs on both Talons will turn off. Now the Talons are successfully Paired together and know their mounted position.
Pair a Remote to one Bluetooth Talon
Every Talon comes direct from the factory with a remote already paired to the Talon. However, any Talon can be paired with up to 3 devices per Talon.
- Retract the anchor on the Talon by pressing the Up button.
- Once the Talon is fully retracted, press and hold the Up button and the Down button on the Remote at the same time until the Talon Selection LEDs on the Remote begin to scroll. Then release them.
- Immediately press and hold the Up button and the Down button simultaneously on the Indicator Panel. The Depth Indication LEDs will begin to flash blue. Once the LEDs are flashing release the buttons on the Indicator Panel. The Talon and Remote will go into Pairing Mode for 20 seconds. If a signal with three fast beeps occurs, the Talon and Remote have successfully paired. If 20 seconds pass while in Pairing Mode and they do not successfully pair, a chirp will sound signaling that the Pairing has timed out.
- If the Pair is unsuccessful, repeat the process.
Pair a Remote to two Bluetooth Talons
In order to Pair a remote to the Talon, please be sure to first Pair the Talons together. When two Bluetooth Talons are paired together, all remotes that were paired to an individual Talon will operate both Talons. Please see the "Pairing Two Talons and Programming the Mounting Location" section below. If the two Talons are already paired together, a remote can be paired to either Talon. When the pairing process is complete, the remote will be able to control both Talons.
- Retract the anchor on both Talons by pressing the Up button.
- Once both Talons are fully retracted, press and hold the Up button and the Down buttons on the Remote at the same time until the Talon Selection LEDs on the Remote begin to scroll. After 2 seconds, release the buttons.
- Immediately press and hold the Up button and the Down button simultaneously on the Indicator Panel of one Talon. The Depth Indication LEDs will begin to flash blue on both Talons. Once the LEDs are flashing release the buttons on the Indicator Panel. The Talon and Remote will go into Pairing Mode for 20 seconds.
- If a tone with three fast beeps occurs, the Talon and Remote have successfully paired. If 20 seconds pass while in Pairing Mode and they do not successfully pair, an error tone will sound signaling that the Pairing has timed out.
- If the Pair is unsuccessful, repeat the process.
Pair the Mobile Device to a Bluetooth Talon
The One-Boat Network app can be used to control the Talon using a device that is paired to the Talon with a Bluetooth connection. Before pairing the device with the Talon, the One-Boat Network app should first be successfully downloaded, installed and signed in. You can confirm that the app was successfully installed by opening it on your device. Once you have signed in to the One-Boat Network App, the app will walk you through connecting your mobile device to your Humminbird and Minn Kota devices.
- Click here for assistance with downloading, installing and signing into the One-Boat Network app.
- One-Boat Network App - Install, Create Account, Sign-in, Forgot Password (Android and iOS) (2023-present)
- Retract the spike on the Talon(s) by pressing the Up
button on the Indicator Panel.
- Enable Bluetooth on the Mobile Device
- Open the Settings menu.
- Select Bluetooth.
- Select On.
- Keep the Bluetooth menu open during the rest of the process. Follow the steps below for pairing to one Talon or Two Talons.
- You may need to turn the Bluetooth off and back on to start the scanning process again.
Pair a Mobile Device to one Bluetooth Talon
-
Apple iOS
- Enable Pairing Mode on the Talon:
Press and hold the Up button and the Down button simultaneously on the Indicator Panel. The Depth Indication LEDs will begin to flash blue. Once the LEDs are flashing, release the buttons on the Indicator Panel. The Talon will go into Pairing Mode for 30 seconds. - On your mobile device, select BT Talon under the Other Devices. It may take a moment for the Talon to appear in the menu. Once your Talon is paired with your device, BT Talon will display under My Devices in the iOS Bluetooth settings.
- Enable Pairing Mode on the Talon:
-
Android
- Enable Pairing Mode on the Talon: Press and hold the Up and Down buttons on the Talon for two seconds. The depth lights will illuminate in a blue pattern to indicate pairing mode is active.
- Navigate to the Bluetooth Settings on your mobile device. Select the Scan button to begin the search for your device.
- On your mobile device, select BT Talon under Available devices. It may take a moment for the Talon to appear in the menu. Once your Talon is paired with your device, BT Talon will display under Paired devices in the Android Bluetooth Settings.
Pair a Mobile Device to two Bluetooth Talons
If you are connecting two Talons, the Talons must be paired together before connecting them to your mobile device. Use the following instructions to pair the Talons together, then follow the instructions above for pairing a Talon to your mobile device.
- Place one Talon in Pairing Mode: Press and hold the Up button and the Down button simultaneously on the Indicator Panel. The Depth Indication LEDs will begin to flash blue. Once the LEDs are flashing, release the buttons on the Indicator Panel. The Talon will go into Pairing Mode for 30 seconds.
- Place second Talon in Pairing Mode: Press and hold the Up and Down buttons on the Talon for two seconds. The depth lights will illuminate in a blue pattern to indicate pairing mode is active.
- Both Talons will beep three times once they are connected, and then both Talon mode lights will flash green.
- On the starboard Talon, press the Up button to set that Talon as starboard. The starboard Talon’s mode light will temporarily illuminate green and the port Talon’s mode light will illuminate red to indicate that the Talon positions are set.
Pair the Bluetooth Talon Foot Switch to one Bluetooth Talon
- Retract the anchor on the Talon by pressing the Up button on the Talon Indicator Panel.
- Once the Talon is fully retracted, press and hold the Up button and the Down button on the Foot Switch at the same time until all of the LED's at the top of the Foot Switch begin to scroll. Then release them.
- Immediately press and hold the Up button and the Down button simultaneously on the Indicator Panel. The Depth Indication LEDs on the Indicator Panel of the Talon will begin to scroll. Once the LEDs are scrolling release the buttons on the Indicator Panel. The Talon and Foot Switch will go into Pairing Mode for 20 seconds. If a signal with three fast beeps occurs, the Talon and Foot Switch have successfully paired. If 20 seconds pass while in Pairing Mode and they do not successfully pair, an error tone will sound indicating that the pairing was not successful, and the Foot Switch will not be able to control the Talon.
- If the Pair is unsuccessful, repeat the process
Pair the Bluetooth Talon Foot Switch to two Bluetooth Talons
In order to Pair a Foot Switch to the Talon, please be sure to first Pair the Talons together. When two Bluetooth Talons are paired together, the Foot Switch that was paired to an individual Talon will operate both Talons. Please see the "Pairing Two Talons and Programming the Mounting Location" section of the Talon Owner's Manual (linked below). If the two Talons are already paired together, a Foot Switch can be paired to either Talon. When the pairing process is complete, the Foot Switch will be able to control both Talons.
Pair to one Talon
The Wireless Stomp Switch can be paired to control a Bluetooth® enabled Talon. Use the top right portion of either the Up Button or Down Button to pair each Wireless Stomp Switch.
- Both Stomp Switches should be paired, so be sure to repeat the process for both the UP and DOWN Stomp Switch.
-
The Bluetooth Talon software should be up-to-date to successfully pair.
- The Talon must have software version 1.460 or newer.
- Retract the anchor on the Talon by pressing the Up button on the Talon Indicator Panel.
- Once the Talon is fully retracted, select a Wireless Stomp Switch to pair. Press and hold the Pairing Button on the Wireless Stomp Switch for at least 5 seconds. It must be the top right corner to initiate pairing. The three red LED's under the button will begin to scroll in a clockwise direction to indicate the switch is in Pairing Mode.
- Immediately press and hold the Up button and the Down button simultaneously on the Indicator Panel on the Talon. The Depth Indication LEDs on the Indicator Panel of the Talon will begin to scroll. Once the LEDs are scrolling release the buttons on the Indicator Panel. The Talon and Wireless Stomp Switch will go into Pairing Mode for 30 seconds. If a signal with three fast beeps occurs, the Talon and Wireless Stomp Switch have successfully paired. If 30 seconds pass while in Pairing Mode and they do not successfully pair, an error tone will sound indicating that the pairing was not successful, and the Wireless Stomp Switch will not be able to control the Talon.
- If the Pair is unsuccessful, repeat the process.
- Repeat the complete pairing process for both Wireless Stomp Switches.
Pair to two Talons
In order to Pair a Stomp Switches to the two Talons, Pair the Talons together first. When two Talons are paired together, any Stomp Switches paired to an individual Talon will no longer be paired. You can then follow the steps for Pairing to One Talon above.
- If you need to pair your Talons together, see the "Pairing Two Talons and Programming the Mounting Location" section of the Talon Owner's Manual.
- If the two Talons are already paired together, the Stomp Switches can be paired to either Talon. When the pairing process is complete, the Stomp Switches will be able to control both Talons.
Pair Talon to Humminbird Fish Finder
This video will show you how to pair your Minn Kota Talon Shallow Water Anchor with your Humminbird fish finder (SOLIX or HELIX). With the One-Boat Network from Minn Kota and Humminbird, you can control your Talon anchor's functions from your Bluetooth-enabled Humminbird SOLIX or HELIX G2N/G3N fish finders. If you have two Talon shallow water anchors, you will need to pair the two anchors together prior to pairing the master Talon to the fish finder.
Clear Paired Devices from Bluetooth Talons
The Talon was designed so that all paired devices can be cleared from memory.
- Retract the anchor on the Talon by pressing the Up button.
- Turn the power to the Talon "off". You can turn off the power to the Talon by pulling the fuse.
- While holding in the Up button on the Indicator Panel, restore power to the Talon. You will hear a long steady tone.
- After the steady tone stops, release the Up button. A series of fast beeps will be heard.
- The Talon memory is now clear of all previously paired devices.
Clear Bluetooth Talons from the Paired Remote
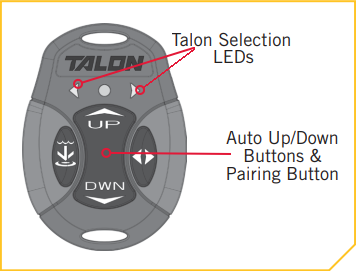

- Press and hold the Up button and the Down button on the Remote at the same time until the Talon Selection LEDs on the Remote begin to scroll, release the buttons.
- The Remote will go into Pairing Mode for 30 seconds.
- Once Pairing times out all Talons will be cleared.
Clear Bluetooth Talons from the Paired Android
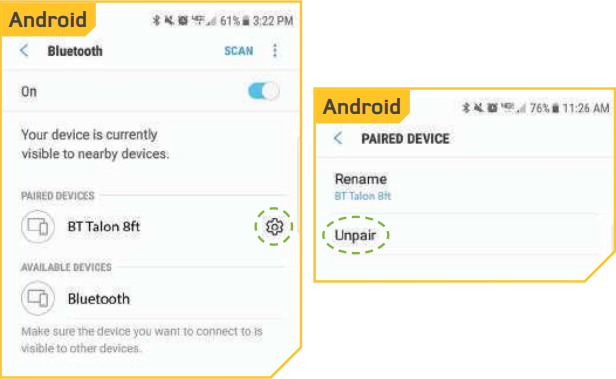
- Open your Bluetooth settings on your device.
- Tap on the gear icon next to the Talon you want to unpair.
- Tap "Unpair".
Clear Bluetooth Talons from the Paired Apple iOS
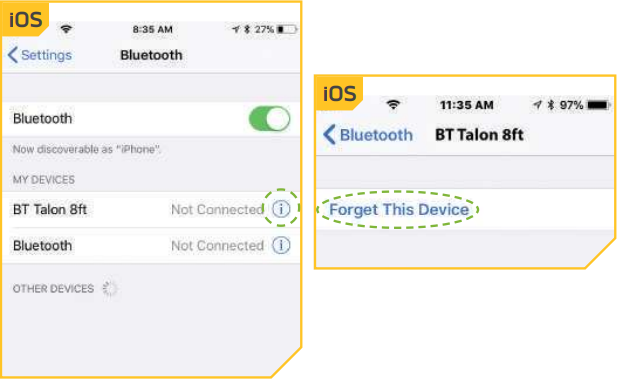
- Open your Bluetooth settings on your device.
- Tap on the "i" icon next to the Talon you want to unpair.
- Tap "Forget This Device".
Clear Pairings from the Wireless Stomp Switches
- Select a Wireless Stomp Switch to clear. Press and hold the Pairing Button on the Wireless Stomp Switch for at least 5 seconds. It must be the top right corner to initiate pairing. The three red LED's under the button will begin to scroll in a clockwise direction to indicate the switch is in Pairing Mode.
- The Wireless Stomp Switch will go into Pairing Mode for 30 seconds. Once Pairing times out all Talon(s)/ Raptor(s) will be cleared.
- Repeat the complete clearing process for both Wireless Stomp Switches.
Troubleshoot Pairing Issues for Bluetooth Talons
If you are having issues with pairing your Bluetooth Talon Shallow Water Anchors, follow the steps below. You can also click on the button for the Bluetooth Talon Pairing Guide
-
Try Again:
If your device fails to pair properly try the pairing process again. -
Cycle Power
Cycle the power to the Talons by turning off and on the master switch (if wired to one) or by pulling out the inline fuse and then reinserting it. After power is restored try the paring process again. -
Other Apps:
Close any other apps that may be open and running in the background. -
Clear Paired Devices:
Clear all paired devices from the Talon and remote and start the pairing process over. Click here to learn how to clear paired devices.
Resources
- Talon Owner's Manual
- Talon Operation Instructions from Humminbird SOLIX & HELIX units
- Talon Footswitch Instruction Manual
- Talon Videos
- Using the Bluetooth Talon Shallow Water Anchor (2018-present)
- Using the One-Boat Network App to Control your Bluetooth Talon (2018-present)
- One-Boat Network App - Install, Create Account, Sign-in, Forgot Password (Android and iOS) (2023-present)
- One-Boat Network App Operations Guide