When you find the right fishing spot time is critical. You can’t wait to anchor, can’t wait to cast, and can’t be bothered to move until you get what you came for. That’s why we designed every inch of Talon to hold you in place effortlessly and relentlessly – every time out. Talon is also the first and only shallow water anchor available in lengths up to 15 feet.
Jump to
- Max Boat Weight and Length
- Install the Talon
- Basic Operations from the Indicator Panel
- Advanced Features and Functions from the Indicator Panel
- Depth Indication LEDs
- Modes
- Basic Operations with the Remote
- Advanced Features and Functions with the Remote
- Deployment Notification Alarm
- Retraction Notification Alarm
- Talon Work Light
- Powering the Talon Shallow Water Anchor
- Power Draw
- Talon Fuses
- Changing the Batteries on the Remote
- Using an App to Control your Bluetooth Talon
- Install the One-Boat Network App
- Talon Serial Number Location
- Dimensions
- Resources:
- Talon Owner's Manuals
- Talon Operation Instructions from Humminbird SOLIX & HELIX units
- Talon Videos
- Using the One-Boat Network App to Control your Bluetooth Talon (2018-present)
- Using the Remote to Control the Bluetooth Talon (2018-present)
- Using the Indicator Panel to Control the Bluetooth Talon (2018-present)
- One-Boat Network App - Install, Create Account, Sign-in, Forgot Password (Android and iOS) (2023-present)
- Updating your Bluetooth Talon Software with the One-Boat Network App (2018-present)
- One-Boat Network App Operations Guide)
Max Boat Weight and Length
A single Talon is capable of anchoring a boat up to 28’ in length, and 4,500 lbs. For boats larger than this, we would recommend an additional Talon to ensure proper anchoring capability.
Install the Talon
-
Reversing the Angle on the Bracket when Mounting Talon
Some boat models have transoms that angle towards the inside of the boat. In these cases, the Talon quick release bracket can be inverted to account for this reversed angle without the hassle of shims. -
Adjusting the Talon Up or Down when Mounting the Talon on a Boat
Each boats sits differently in the water, and has varying amounts of draft (hull under the water line). While Minn Kota recommends that the Talon mounting bracket be mounted as high up on the transom as possible, Minn Kota also recommends that the bottom of the Talon be a minimum of 4" up from the bottom line of the hull of your boat. Having this adjustability will minimize any spray that may occur while underway, and offer the greatest amount of stability to the Talon. -
Adjusting the Minn Kota Talon Shallow Water Anchor Extrusion Lower to the Water to Gain More Depth
You can adjust the extrusion lower to the water to gain more depth. However, the user must be aware that Minn Kota recommends a minimum of 4" up from the bottom of the hull line to minimize spray. Dragging the Talon through the water while underway could cause damage to the Talon and/or transom of your boat. -
Electrical Plug for the Minn Kota Talon Shallow Water Anchor Lead Wires to Disconnect the Talon from Power
Minn Kota offers a Quick Release Disconnect Power Plug accessory specifically designed for the Minn Kota Talon. -
Installation Location
Minn Kota recommends installing Talon on the port (left) side of your boat in order to give you the maximum amount of clearance between the boat engine and the control panel on Talon. However, Minn Kota's Talon can be installed on either side of the boat.
Determining where and how to mount the Talon will vary from one boat to the next. It is important to check for proper steering and trimming clearances when laying out your installation. See the Talon installation guide for detailed instructions or the Talon adapter bracket selection guide.
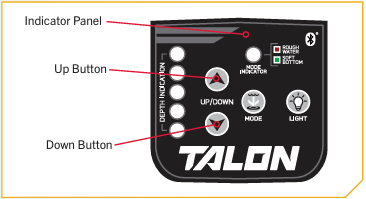
Basic Operations from the Indicator Panel
-
Deploy the Talon from the Indicator Panel
- To deploy the Talon, press the Down Button on the Indicator Panel.
- While the anchor is deploying, the action can be paused on the panel by either pressing the Down button again, or pressing the Up button.
- The paused deployment can be resumed by pressing the Down button again.
- Once the deploying anchor gets to its full length of travel or comes in contact with the bottom, it will go through an anchoring sequence determined by the current Mode and then stop.
-
Retract the Talon from the Indicator Panel
- To retract the Talon, press the Up button on the Indicator Panel.
- While the anchor is retracting, the action can be paused on the panel by either pressing the Up button again, or pressing the Down button.
- The paused retraction can be resumed by pressing the Up button again.
- Once the retracting anchor on the Talon gets to its fully retracted state, it will stop. If the Talon is already fully retracted and the Up button is pressed again, an error tone will sound.
Advanced Features and Functions from the Indicator Panel
-
Toggle the Mode from the Indicator Panel
- Toggle the Mode on the Indicator Panel when the water or anchoring conditions change to fit your anchoring needs.
- The Mode can be toggled from the Indicator Panel by selecting the Mode button. The Mode Indicator LED displays the Mode that the Talon is currently set to. Press the Mode button to toggle to the desired Mode.
- When no color is present on the LED, the Talon is in Standard Mode. When the LED is Green, the Talon is in Soft Bottom Mode. When the LED is Red, the Talon is in Rough Water Mode.
-
Toggle the Work Light "on" and "off" with the Indicator Panel
- The Work Light is an accessory light at the top of the Talon. When the Work Light is turned "on", the LEDs can be either white or blue.
- To Toggle the Work Light "on", press the Light button on the Indicator Panel.
- To toggle the Work Light "off" wait 5 seconds and press the Light button again.
-
Toggle the Work Light Color and Intensity on the Indicator Panel
- The Work Light on the Talon has a high - medium - low intensity setting of white LEDs and blue LEDs. When the Work Light is turned on, the LEDs will be either white or blue, and then an intensity setting can be selected.
- When the Work Light is "off", press the Light button once on the Indicator Panel to turn the light "on". The light will turn on with the last light intensity and color selection that was used.
- If the Light button is pressed again in less than 5 seconds, the lights will move to the next intensity and/or color. Continue to press the Light button until the desired light is selected. If more than 5 seconds passes between any button press, the current color and setting will be "saved" to memory, and the Work Light will turn "off" instead of toggling to the next selection.
-
Change the Intensity of the LEDs in the Indicator Panel
- The Indicator Panel LEDs, by default, are at the brightest setting. It is possible to change the intensity of the LEDs to meet personal preference or adjust them to fit the ambient lighting conditions. The LED's can toggle between three intensities; high, medium and low.
- Press and hold the Light button for 2 seconds.
- Continuing to hold the Light button will cause the Indicator Panel LEDs to begin toggling through 3 different intensities of high, medium, and low.
- Release the Light button once you have achieved the desired intensity.
Depth Indication LEDs
The Depth Indication LEDs display the depth that the anchor is deployed in 20% increments. Each Depth Indication LED will flash while moving through it's depth percentage, and turn solid when that depth percentage is passed.
The first Depth Indication LED will flash blue as soon as the Talon is deployed. If the anchor stops for any reason while it is in the top 20% of the deployment sequence, the top LED will stay solid. The top Depth Indication LED will always illuminate to a solid color if the Talon is not fully retracted.
The bottom Depth Indication LED will only illuminate solid when the Talon has reached 100% deployment.
Modes
The Talon operates in three different modes. Each Mode is designed for a specific on water scenario and changes the anchoring behavior of the Talon when it deploys. Talon is capable of anchoring in most conditions and it is important to select the right anchoring mode.
- Standard Mode - Standard Mode is the default anchoring Mode for Talon. When put in Standard Mode, the Mode Indicator LED in the Indicator Panel will toggle between red and green and then turn off. In Standard Mode, Talon's Auto Deploy will operate with maximum down-force with a complete Auto-Drive cycle of three hits spaced at three seconds apart.
- Soft Bottom Mode - In Soft Bottom Mode, the Mode Indicator LED will be lit green on the Indicator Panel. In Soft Bottom Mode, the Auto Deploy will operate at a reduced power with a single hit.
- Rough Water Mode - In Rough Water Mode, the Mode LED Indicator on the Indicator Panel will be lit red. In Rough Water Mode, the Auto Deploy will operate with maximum down-force with three Auto-Drive cycles of three hits each, spaced 3 seconds apart. The three Auto-Drive cycles will be spaced at 10 second intervals.
Toggle the Mode from the Indicator Panel
- The Mode can be toggled from the Indicator Panel by selecting the Mode button. The Mode Indicator LED displays the Mode that the Talon is currently set to. Press the Mode button to toggle to the desired Mode.
- When no color is present on the LED, the Talon is in Standard Mode. When the LED is Green, the Talon is in Soft Bottom Mode. When the LED is Red, the Talon is in Rough Water Mode.
Toggle the Mode from the Remote
- The Mode can be toggled from the Remote by selecting the Anchor Mode button. The Mode LED displays the Mode that the Talon is currently set to. Press the Anchor Mode button to toggle to the desired Mode.
- When the Talon is put in Standard mode, the LED will flash red and green and then turn off. When the LED is Green, the Talon is in Soft Bottom Mode. When the LED is Red, the Talon is in Rough Water Mode.
Work Light
The Bluetooth Talon has a work light that can change intensity and color. The LED's can toggle between three intensities; high, medium and low. The LED's can also toggle between two colors; white or blue.
Toggle the Work Light "on" and "off" with the Indicator Panel
- To Toggle the Work Light "on", press the Light button on the Indicator Panel. To toggle the Work Light "off" wait 5 seconds and press the Light button again.
Toggle the Work Light Color and Intensity on the Indicator Panel
The Work Light on the Talon has a high - medium - low intensity setting of white LEDs and blue LEDs. When the Work Light is turned on, the LEDs will be either white or blue, and then an intensity setting can be selected.
- When the Work Light is "off", press the Light button once on the Indicator Panel to turn the
light "on". The light will turn on with the last light intensity and color selection that was used. - If the Light button is pressed again in less than 5 seconds, the lights will move to the next intensity and/or color. Continue to press the Light button until the desired light is selected. If more than 5 seconds passes between any button press, the current color and setting will be "saved" to memory, and the Work Light will turn "off" instead of toggling to the next selection.
Change the Intensity of the LEDs in the Indicator Panel
The Indicator Panel LEDs, by default, are at the brightest setting. It is possible to change the intensity of the LEDs to meet personal preference or adjust them to fit the ambient lighting conditions. The LED's can toggle between three intensities; high, medium and low
- Press and hold the Light button for 2 seconds.
- Continuing to hold the Light button will cause the Indicator Panel LEDs to begin toggling through 3 different intensities of high, medium, and low. Release the Light button once you have achieved the desired intensity.
-
Basic Operations with the Remote
-
Selecting a Talon to Operate with the Remote
The Talon Selection button toggles the Talon that the remote is controlling when 2 Talons are installed on the boat. The selection toggles between a Talon mounted on the Port or Starboard side of the boat, or it can control both Talons at the same time. The Talon Selection LED's are lit based on the selection made.- To toggle the Talon selected, press the Talon Selection button, repeatedly until the desired Talon is selected.
- When the button is pressed, one or both of the Talon Selection LEDs will be lit.
- If the remote is oriented so the LEDs are facing upward, the arrow on the right will be lit when the Starboard Talon is selected.
- If the arrow on the left is lit, the Port Talon is selected.
- If the LED in both arrows is lit, both Talons are selected.
-
Deploy the Talon from the Remote
To deploy the Talon, double press the Down button on the Remote.- While the anchor is deploying, the action can be paused on the remote by pressing either the Down button or Up button again.
- The paused deployment can be resumed by double pressing the Down button again.
- Once the deploying anchor gets to its full length of travel or comes in contact with the bottom, it will go through an anchoring sequence determined by the current Mode and then stop.
-
Retract the Talon from the Remote
To retract the Talon, press the Up button on the Remote.- While the anchor is retracting, the action can be paused on the remote by pressing either the Up button or the Down button.
- The paused retraction can be resumed by pressing the Up button again.
- Once the retracting anchor on the Talon gets to its full retraction it will stop. If the Talon is already fully retracted and the Up button is pressed again, an error tone will sound.
Advanced Features and Functions with the Remote
-
Toggle the Mode from the Remote
The Mode can be toggled from the Remote by selecting the Anchor Mode button. The Mode LED displays the Mode that the Talon is currently set to. Press the Anchor Mode button to toggle to the desired Mode.- When the Talon is put in Standard mode, the LED will flash red and green and then turn off.
- When the LED is Green, the Talon is in Soft Bottom Mode.
- When the LED is Red, the Talon is in Rough Water Mode.
-
Control the Work Light with the Remote
The Work Light at the top of the Talon can be either white or blue and toggled between high, medium, or low intensities.- To Toggle the Work Light "on", press and hold the Talon Selection button until the Work Light on the top of the Talon turns "on".
- Continue to press the Talon Selection button on te Remote again before 5 seconds passes until the desired color and intensity is selected.
- To toggle the Work Light "off" press and hold the Talon Selection button again until the Work Light turns "off".
-
Selecting a Talon to Operate with the Remote
Deployment Notification Alarm
The Deployment Notification Alarm Wire is a green wire that comes from the Power Cable and, when installed, is used to sound an alarm, when the Ignition Switch is turned to the "on" position with the Talon deployed. When connected and the Talon is properly stowed, no tone will be emitted when the Ignition Switch is turned "on".
Adjusting the Audible Alarm
The Talon audible alarm is pre-set and cannot be adjusted.
Connecting the Deployment Notification Alarm
The Deployment Notification Alarm is usually connected when installing the Talon. If you are connecting it after the Talon is installed, follow the steps below.
- The optional Deployment Notification Alarm will be connected to the side of the 12 volt Ignition Switch that lacks power when the switch is turned "off". Use a voltmeter to determine where this connection exists. You may need to turn the Ignition Switch "on" and "off" to verify this connection with the voltmeter. 12 volts should be present at the connection when the ignition switch is turned to the "on" position and no voltage should be present when the switch is turned to the "off" position.
- Next determine if the Deployment Notification Alarm Wire is long enough to reach the intended
connection. If additional wire is needed, use a wire that is no smaller that 12 AWG. - Be sure that the Ignition Switch is turned to the "off" position. Cut off the sealed end of the green Deployment Notification Alarm Wire on the Power Cable and splice it to the 12 AWG minimum gauge wire, or if there is enough slack in the wire, directly to the switched side of the Ignition Switch that was just tested. Use an adhesive filled heat shrink to waterproof and secure the splice.
- If an additional wire was used, close the final connection between the Ignition Switch and the
additional 12 AWG wire and seal with an adhesive filled heat shrink.
Retraction Notification Alarm
The Talon is equipped with a Retraction Notification Alarm to protect the lift motor. If the lift capacity of the motor is exceeded or the motor takes more that 10 seconds to retract, the motor will stop and emit a series of three sets of three beeps. This is different from the Deployment Notification Alarm, which will emit a tone each time the ignition key is turned "on" and the anchor is not retracted. The Retraction Notification Alarm sounds when the Talon fails to retract.
The most common reasons for the Retraction Notification Alarm sounding are:
- Because of an extremely soft or muddy bottom and the Spike is deeply buried and cannot retract on its own.
- There may be an excessive amount of side load on the Spike, generally due to fast moving water currents or wind.
- Battery Power is low. This may create a retraction time that is greater than 10 seconds.
- Obstructions on the anchor prevent it from retracting.
If the Retraction Notification alarm is emitted, the following steps should be taken to retract the anchor.
- Press the Up button on the Indicator Panel or the Up button on the Remote. If the Spike does not raise within two attempts:
- Loosen the Spike from the bottom by carefully driving the boat back and forth using the main engine power. Then attempt to raise the anchor again. This is especially useful if you are fishing in a soft or muddy bottom structure.
- Remove any excessive side loads on the anchor as described above. This generally requires re-backing against the current or the direction of the load and then attempting to retract the anchor again with the side load removed. In the event that the Spike cannot be retracted normally, please refer to the "Manually Retract the Talon" section of the manual linked at the bottom of the page.
Power the Talon Shallow Water Anchor
- The Minn Kota Talon shallow water anchor is a mechanical design that is 100% electricity driven, so there is no messy hydraulic fluid and/or hoses to deal with. The Talon will operate with any lead acid, marine 12 volt battery. For best results, Minn Kota recommends connecting to the starting battery. Maintain battery at full charge. Proper care will ensure having battery power when you need it, and will significantly improve the battery life.
Power Draw
- The Talon draws a small amount of residual current from the battery even when it is not in use. If the Talon will not be used for more than five days, the power leads should be disconnected from the battery.
- Do not connect the Talon to the same batteries that power a trolling motor or other accessories. It is recommended that the Talon be connected to the starting battery through a battery selector or power disconnect switch. This allows power to the Talon to be shut off when the switch is in the “Off” position.
- If you are not using a battery selector or power disconnect switch, the Talon may be connected directly to the starting battery.
- Note: The Talon should be disconnected from the batteries while charging.
Talon Fuses (2011-present)
All Talons use a 30 amp fuse to protect them from power surges. The type of fuse depends on the Talon.
Two Stage Talons (6' & 8'): In-line 30A blade style fuse. These can be purchased at any automotive parts store.
Three Stage Talons (8', 10', 12'): in-line 30A re-settable blade style fuse, part number 2378231
Resetting the Bluetooth Talon Fuse
In the event that you need to reset the factory installed 30 amp Fuse, follow the instruction below. The fuse should be located no more that 7 inches from the Positive Battery terminal on the Positive Lead (+). If an alternate Fuse is installed, please refer to directions by your Fuse manufacturer to correctly reset it.
- Remove the protective cover from the Fuse Assembly, exposing the 30 amp Fuse.
- Reset the Fuse by pushing the Breaker Button to engage the Fuse.
- Ensure that the Seal is in place, and replace the protective housing on the Fuse Assembly. Make sure that the Cover snaps together to provide a watertight seal.
Changing the Batteries on the Remote
- To change the battery, you will need a CR2450 battery. Remove the battery by using a large coin to turn the battery cover counterclockwise to line up the Unlock icons on the back of the remote. Remove the cover and the old battery. Put in the new battery with the positive side facing out of the remote and replace the battery cover.
Using an App to Control your Bluetooth Talon
- You can use the One-Boat Network App to control your Bluetooth Talon(s). The app can be downloaded to your mobile device from the Google Play Store (Android) or the Apple App Store (iOS). Click here for information on using the One-Boat Network App to Control your Bluetooth Talon (2018-present)
Download and Install the One-Boat Network App
You can download and install the One-Boat Network App on your Android or i-Phone by following the steps below. You can also navigate to the Play Store on Android and the App Store on i-Phone and then searching for "One Boat Network". To install the app, follow the instructions on your phone.
Android
*Your Android must have software version 6.0 or newer (API level 23)
-
If you are currently using your phone:
- Tap the link below to Go To the One-Boat Network App in the Google Play Store
- Tap on Install (the app is free to install)
- Once installed, Tap Open
-
If you are not currently using your device:
- On your device, open Google Play Store
- Search for One-Boat Network
- Tap on One-Boat Network by Johnson Outdoors
- Tap on Install (the app is free to install)
- Once installed, Tap Open
Click here to download the One-Boat Network App for Android
Apple iOS
*Your Apple iOS must have software version 12.0 or newer
-
If you are currently using your phone:
- Tap the link below to Go To the One-Boat Network App in the Apple App Store
- Tap on Install (the app is free to install)
- Once the One-Boat Network App is installed, tap the Open button
-
If you are not currently using your device:
- On your iPhone, open the App App Store.
- Search for One-Boat Network
- Tap the Get button (the app is free to install)
- If prompted, enter in your Apple ID to install
- Once the One-Boat Network App is installed, tap the Open button
Click here to download the One-Boat Network App for i-Phone
Note: When you log out of the One‑Boat Network App, you will need to log back in using your original email address and password. If you don’t remember your password, you can select “Forgot Password” to reset it.
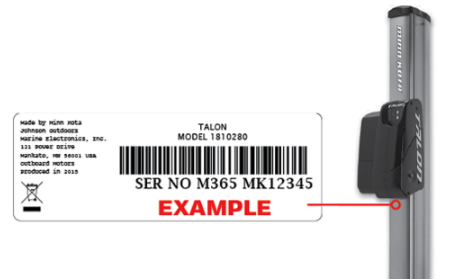
Talon Serial Number Location
Dimensions
Talon 8 foot Dimensions
Talon 10 foot Dimensions
Talon 12 foot Dimensions
Talon 15 foot Dimensions
Mounting Bracket Dimensions
Resources
- Talon Owner's Manuals
- Talon Operation Instructions from Humminbird SOLIX & HELIX units
- Talon Videos
- Using the One-Boat Network App to Control your Bluetooth Talon (2018-present)
- Using the Remote to Control the Bluetooth Talon (2018-present)
- Using the Indicator Panel to Control the Bluetooth Talon (2018-present)
- One-Boat Network App - Install, Create Account, Sign-in, Forgot Password (Android and iOS) (2023-present)
- Updating your Bluetooth Talon Software with the One-Boat Network App (2018-present)
- One-Boat Network App Operations Guide)