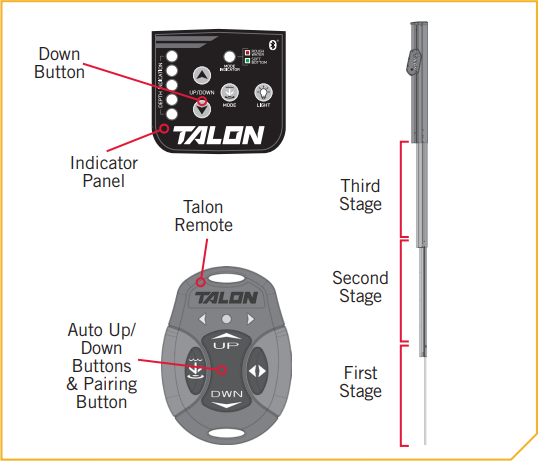
The Spike for your Talon comes with a lifetime guarantee. For additional information and details, see Minn Kota Limited Warranty on Talon Shallow Water Anchors. In order to replace the Spike, you must have enough room to extend the entire First Stage and the beginning of the Second Stage of the Talon. Determine if you have room to replace the Spike in the vertical position. If there is not enough space to replace the Spike in the vertical position, it may be required to remove the Talon from the Mounting Bracket. The Talon Tilt Bracket (1810222) is an accessory available to make this process easier. With this accessory, you don’t have to remove the Talon from the mount to replace the Spike as it allows the Talon to be rotated into a horizontal position.
Jump to:
-
TALON MANUALS: 3-STAGE MODELS
-
TALON MANUALS: 3-STAGE MODELS
- 2011-2013 Talon Owner's Manual-For 8', 10', and 12', three-stage models manufactured 2014-2017 (not Bluetooth® compatible)
- 2014-2017 Talon Owner's Manual - For 8', 10', and 12', three-stage models manufactured 2014-2017 (not Bluetooth® compatible)
- 2014-2017 Talon Installation Guide - For 8', 10', and 12', three-stage models manufactured 2014-2017 (not Bluetooth® compatible)
-
TALON MANUALS: 2-STAGE MODELS
See the links at the bottom of this web page if you need to order a Replacement Spike or view the Parts Diagram for your Talon. There is also a PDF with the instructions if you would like to print it out.
Replacing the Spike

- Press the Down button on the Indicator Panel or the Down button on the Remote to extend the Spike out so that the Second Stage begins to exit the bottom of the Talon. This may require removing the Talon from the Mounting Bracket, and laying it horizontally or on a flat surface
- Once extended, remove the Talon from the Power Source.
- Locate the Spike Isolator Retainer Pin in the Second Stage of the Talon. Carefully remove the Retainer Pin using a Pin Punch and Hammer.
- Set the Spike Isolator Retainer Pin aside for later use, in reassembly. Slide the Spike Isolator along the Spike, away from the Second Stage.
- Gently pivot the Second Stage Debris Shield up out of the way to access the Spike Retainer Screw. The adjacent plastic Debris Channel Tab will bend slightly, but can be tapped back into place with a small hammer after the Spike is replaced.
- Locate the Spike Retainer Screw and remove it using a 3/32" Allen Wrench.
- Once removed, the Spike should pull free from the Second Stage along with the Spike Retainer and an O-ring that is in place around the Spike. The Spike Retainer is the piece that the Spike Retainer Screw was just removed from.
- Discard the Spike Retainer Screw, Spike, O-ring and Spike Isolator that were just removed. Keep the Spike Retainer for reassembly.
- Take the new Spike and locate the groove along one end. Slide the new Spike Isolator and then O-ring onto the Spike on the end where the groove is located. Slide them down so they are 5 to 6 inches past the end of the Spike.
- Locate the raised ring on the inside curve of the Spike Retainer and align it with the groove at the end of the Spike. Place the Spike Retainer on the Spike so that it is keyed in place by aligning the raised ring and groove.
- Slide the assembly back into the Second Stage and replace the Spike Retainer Screw in the Spike Retainer using a 3/32" Allen Wrench.
- Once the Screw is secure, close the Second Stage Debris Shield.
- Push the O-ring and Spike Isolator towards the Second Stage and until they are in position against the Spike Retainer and Second Stage Debris Shield.
- Carefully replace the Spike Isolator Retainer Pin, making sure the ends of the pin are recessed on both sides.
- If the Talon was removed to replace the Spike, reassemble the Talon into the Mounting Bracket. Reconnect power before using the Talon or retracting the Spike.
- Press the Up button on the Indicator Panel or the Up button on the Remote to retract the Talon.
Replacement Spikes
- SPIKE REPLACEMENT KIT, 15' 2882028
- SPIKE REPLACEMENT KIT 12' 2882008
- SPIKE REPLACEMENT KIT, 10' 2882007
- SPIKE REPLACEMENT KIT for 3 STAGE 8' 2882027
- SPIKE REPLACEMENT KIT for 2 STAGE 8' 2882008
- SPIKE REPLACEMENT KIT 6' 2882009
Parts Diagrams
- 2 Stage, 6 and 8 foot Talon (2011-2015)
- 3 Stage, 8, 10, or 12 foot Talon (2014-2017)
- 3 Stage, BT, 8, 10, 12, 15 foot Talon (2018-Current)
Resources
TALON MANUALS: 3-STAGE MODELS
For 8', 10', 12', and 15' three-stage models manufactured 2018 and later (Bluetooth® compatible)
- Talon Owner's Manual
- Talon Installation Guide
- Talon Operation Instructions from Humminbird SOLIX & HELIX units - English
- Talon App Set up & Pairing Instructions
- Talon App Instructions
- Talon Updates for Android Devices
- Talon Updates for iOS Devices
TALON MANUALS: 3-STAGE MODELS
For 8', 10', and 12', three-stage models manufactured 2014-2017 (not Bluetooth® compatible)
- 2011-2013 Talon Owner's Manual-For 8', 10', and 12', three-stage models manufactured 2014-2017 (not Bluetooth® compatible)
- 2014-2017 Talon Owner's Manual - For 8', 10', and 12', three-stage models manufactured 2014-2017 (not Bluetooth® compatible)
- 2014-2017 Talon Installation Guide - For 8', 10', and 12', three-stage models manufactured 2014-2017 (not Bluetooth® compatible)
TALON MANUALS: 2-STAGE MODELS
for 6' and 8' two-stage models manufactured 2011-2013 (not Bluetooth® compatible)
- Talon Owner's Manual- for 6' and 8' two-stage models manufactured 2011-2013 (not Bluetooth® compatible)
- Talon Installation Guide- for 6' and 8' two-stage models manufactured 2011-2013 (not Bluetooth® compatible)

